My STAMPING PAPERCRAFT blog - Stamping Scene

Hello and welcome to my blog. I'm a paper craft addict and love sharing my passion for paper crafting . I run online and face to face card making, memory keeping and all sorts of 3D projects. I also sell many of the products I use. If you'd like more information do drop me an email. Thank you for visiting I hope to see you again soon. Zoe x
Showing posts with label paper craft tutorial. Show all posts

Friday, 24 February 2023

Masking Techniques for card making

masking technique card using seaside bay stamps from stampin up spring mini 2023

totally techniques blog hop banner

Welcome to our first Totally Techniques Blog Hop of 2023. This month we are sharing any type of masking technique. 
I've gone for using masking paper to create a scene with overlapping images and a sea bed as well as the sea above it. 

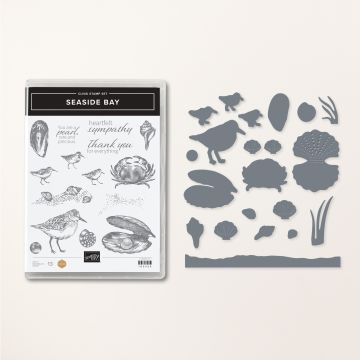
I started my card by tearing a strip of masking paper that was long enough to go right the way across my design layer.  I placed it with the torn edge towards the base of the layer but a few centimetres or inch or so away from the bottom of the layer.  I stamped using the background stamp Hand-drawn dots on top of a  layer of blending brush colour. I also used the pebble stamp from the stamp set Seaside Bay. 


Again using stamps from the set I added some images and also stamped some in second generation ink before no line water coloring them prior to die cutting them out with the Seaside Bay dies.  I added these to the design at the end using glue dots for a little dimension.
To add more colour and dimension I used the aperture created by die cutting the seaweed pieces from masking paper.  I used a blending brush to add the colour and it also allowed me to overlap the different pieces and create shading and depth.  By moving the homemade stencil about it gives you the opportunity to change the direction of the weed. 

close up of under the sea scene handmade card using the Seaside Bay stamp and die bundle from Stampin Up

I love this bundle of products and in particular the flat adhesive backed pearls that are so pretty.  They really add to my die cut shell and give more sparkle to the sea bed along with a touch of Wink of Stella to the crab's shell. 
I added a layer of card stock stamped with the shells as a matt layer and then matted the whole design onto a Merry Merlot (I always think that sounds so inviting tee hee) as the card base. It's a colour that I don't often use but I was really pleased how it turned out on this card for the seaweed, base card and I also added touches when watercoloring the crab, not to mention the single simple image stamped inside the card. 
I used the same matting technique for the sentiment from Party Puffins stamp set.  The idea of a seaside scene reminds me of summer and pushes the winter chills out the mind. Roll on Spring.

crab stamp on inside of handmade seaside bay card

Remember Saleabration is our biggest promotion of the year and ends on Tuesday 28 Feb so if you have an order of £45 or more don't forget to visit my shop so that you can grab yourself a free gift too while the promotion lasts. 
Thanks for visiting me and I hope you'll head off to see the other fab designs from my friends around the globe on our Stampin' Up! blog hop.  
View more ideas with Seaside Bay.

Warm hugs
Zoe x

You are invited to the Inlinkz link party!

Click here to enter


Supply List
seaside bay stamp and die bundle from stampin up shop with zoe tant uk


flat adhesive-backed pearls for card making and scrapbooking and craft embellishment


Blending brushes for paper craft


add sparkle to your paper craft makes with wink of stella


Last few days to join the fun community of Stampin' Up! and The Tantalizing Stampers.
3 Choices
1. Choose £170 of products pay only £99 with free P&P
2. Choose £170 of products and a white Mini Cut and Emboss Machine and pay only £125 with free P&P
3. Choose £170 of products and a blue Mini Cut and Emboss Machine and pay only £125 with free P&P


Sunday, 26 April 2020

Christmas Gleaming Already......

handmade Christmas card using Stampin' Up! Christmas Gleaming stamps and ornament punches
Yes Christmas Gleaming already as it's Christmas Card Club Sunday once again and I've used this fab Stampin' Up! set that is not available at the moment, but will be again later in the year so I'm teasing you with this simple elegant card.

Lovely Kate set our club challenge today and if you haven't guessed already it was to use baubles in some shape or form.  I did another bauble card two challenges ago  as I didn't read ahead on the challenge list but have gone on a different tack today compared to my previous card. 

I love the different baubles in this stamp set and having seen some fabulous cards made last Christmas I've taken on a colour combo that really appealed to me using Merry Merlot and Early Espresso with a  splash of gold and sparkle.

I stamped the central image first then punched a paper mask using the coordinating punch.  I used the mask and my Stamparatus to hold everything in place and position my next bauble exactly where I wanted it.  I repeated this for the second slightly hidden one also.

I stamped the holly several times and used a blender pen to drag colour from the veins of the leaves across the rest of each leaf and also added a little more ink from the ink pad lid using the blender also.   I repeated this for the berries but just used the Merry Merlot ink.  These were all fussy cut and I used different parts to create a garland across the baubles.   I then added some clear Wink of Stella for the sparkle.

The sentiment is heat embossed with gold embossing powder and I added a partial hexagon using the Stitched Nested Labels behind the design in Merry Merlot to frame it.  Also before die cutting the merlot hexagon I stamped in the the holly tone on tone and then embossed using the Swirls and Curls embossing folder.  

It may seem the wrong time with the sun shining and other things going on to think of Christmas cards, but i've seen other posting for supplies and making them to be ready for whatever festive season we may have this year.  If you are ready just think of the other fun you could be having and what a great way to fill time now.  Don't forget also that making and sending cards is a great way to connect right now as well as at Christmas, so be sure to #makeacardsendacard .  

Hope you continue to keep well and safe and see you next time.  I'll be back soon with my next DT card for the Moving Along with the Times May challenge.  

Hugs Zoe x


Remember the Last Chance List of products with some great discounts if you find something that suits is now available under Sales and Specials 

Sunday, 15 March 2020

Christmas Wreath Card Tutorial


I love the idea of using products and stash that aren't specifically Christmas themed for Christmas projects.  Today Lorraine set the challenge of creating a wreath or garland card.  I decided to go with traditional colours, although my green is very bold ie Granny Apple Green and the red comes from the Peaceful Poppies sequins that are light and dark Poppy Parade.  I've added my usual bling as gold sequins with some gold foil card and a few pearls too. 


To make the card I sponged Granny Apple Green ink with a dauber onto a 5" X 5" square of white card.  I then used 3rd generation ink to stamp the holly sprigs from Christmas Gleaming  (it's back in the autumn if you missed it in the winter mini 2019) in the same colour ink.  I used a blender pen to add some light colouring to the berries and when completely dry I highlighted the berries with Clear Wink of Stella.  It just adds a shimmer that is subtle.  It's not easy to photograph, but in your hands it sparkles on cards as it catches the light.  I also added some 3rd, 4th, 5th generation stamping using the small splatter stamp from Stampin Up Christmas Gleaming set to add some delicate detail and definition to the sponging. 

I used a die from the Painted Labels die set to cut a wreath shape again in Granny Apple Green.  This I decorated with some of the sequins I mentioned above and gold metallic pearls or red rhinestones depending upon the sequin from our Annual Catalogue.  I used a sentiment from another set that will be available again in this years Winter Mini, Most Wonderful Time product medley.  I stamped with Versamark ink onto black card and added white embossing powder before heating.  I matted this onto an off cut of gold foil card.  
The design layer I matted onto a card blank 5 3/4" square when folded and then used my Granny Apple Green marker to add freehand doodling.

I hope your Sunday is relaxing and you are able to maintain a calm, sensible approach to the terrible blight we are all facing right now.  Keep smiling as although not the excuse you would want you can now legitimately stay home and craft.

Do visit the other ladies in a Christmas Card Club Challenge group to gain more ideas and inspiration.

In the meantime don't forget that Saleabration is on until the end of this month if you like a free gift with your purchase shop in my Stampin' Up! online shop or if you prefer a 20% discount on all your Stampin' Up! shopping from now until the end of March please shop HERE and nominate me as your demonstrator if you don't already have one.

Thanks for popping by.

Zoe x