

Welcome to our final Totally Techniques International Stampin' Up! demonstrator blog hop. We are sharing the shaving foam with stencils technique which I have to say I hadn't done as a joint technique before and although it can get a little messy it was a lot of fun experimenting and finally settling on this design to share.

To start you need a shallow tray, something like an open stamp case is perfect and you add some shaving foam not gel. It can be the cheapest you can find in the supermarket and if you like fragrance that's fine, but if you don't try to choose a fragrance free tin.
Use something like a small ruler or old gift card to smooth out the foam in your tray to create a layer that you can add drops of ink onto. I used Stampin' Up! re inkers Misty Moonlight and Magenta Madness. Choose your colours carefully as they will mix and you could get brown or an overpowering single colour which if you prefer is fine, but you may like the two tone effect that I created also.
Drop several dots of ink onto the foam and then gently 'stretch' out the ink using a coffee stick or orange nail stick. You can then use a spatula or I used one of my embossing paste tools to lift some foam and ink to put onto a stencil placed and possibly secured with Washi tape over a piece of white or coordinating coloured card. I used Fresh Freesia card and the Adorning Designs Decorative masks from the Stampin' Up! winter mini, in particular the snowflake design, but any stencil will work and if you don't have one you could make your own with dies and something like vellum card. You only need to paste a thin layer of the inky foam over the stencil to try to keep the images you create nice and crisp. Once you've covered as much of the stencil as you want to you can lift the stencil and either allow the piece to dry before wiping off excess foam or wipe straight away to add some smearing. Experiment to see which you prefer. There won't be too much if you've kept to a thin layer to begin with. Have some scrap or kitchen paper in place to put your inky stencil and tools on.

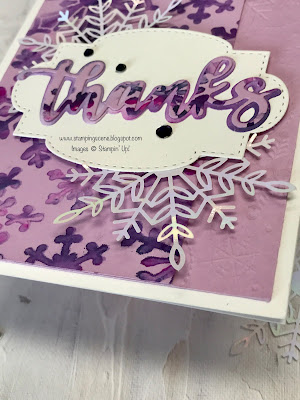
Once dry I cropped my snowflake artwork to the size I wanted and added to a snowflake embossed layer on a white card base. I used off cuts to die cut the thanks (spring catalogue die sneak peek!!!) and added it to a die cut layer which I matted a couple of the winter mini Wonderful Snowflakes onto and also added some Holiday Rhinestones in Night of Navy.


Please do visit the other Stampin' Up! demonstrators posts as I have no doubt that there will be some very varied versions of this technique to give you lots of inspiration.
Thanks for stopping by and we'll see you next year with more Totally Techniques Blog Hops.
Keep safe and keep stamping
Hugs Zoe x
Shopping List Below


2 comments:
What a beautiful card Zoe, I love the design and colours. It's a fabulous technique, Kate x
An interesting technique with very pretty results too, lovely card.
Thank you for my Christmas card which arrived yesterday. Wishing you and your family a Happy & Healthy Festive Season and 2022.
Lorraine xx
Post a Comment