My STAMPING PAPERCRAFT blog - Stamping Scene

Hello and welcome to my blog. I'm a paper craft addict and love sharing my passion for paper crafting . I run online and face to face card making, memory keeping and all sorts of 3D projects. I also sell many of the products I use. If you'd like more information do drop me an email. Thank you for visiting I hope to see you again soon. Zoe x
Showing posts with label teeny tiny sentiments. Show all posts

Friday, 5 February 2016

Stampin' Up! Weekly Deals - Sheltering Tree

As you know Stampin' Up! have weekly deals that offer a limited time discount on selected products. This week is no exception, but hosts the fabulous Sheltering Tree stamp set.  It is such a beautiful group of stamps that can be used all year as the tree lends itself to every season of the year depending upon how you use it.  There are, somewhat early, signs of spring around us with the blossom and snowdrops appearing.  Can you remember the last time you saw daffodils in January.....?  Hence I've turned my tree into an early blossom tree.  Along with paper from the Love Blossoms 6" x 6" stack in the Stampin' Up! spring catalogue, a doily and some embossing using the Softly Falling and  Large Polka Dot embossing folders.  You can use the banner punch in reverse by sliding a strip of card 1.5cm wide into the punch from above to just banner punch the end of your sentiment strip.  Here the sentiment is from Teeny Tiny Wishes.

You might remember I made a bit of a stunning (if I say so myself) birthday card for my Mum with this set. You can see the full details in my stampin up post, but here are a couple of pics for more inspiration.  You can also see a winter version in my Christmas card club post.
 

I love for you to have this stamp set in your collection and it is always nice to get a bargain so please do choose me as your demonstrator and shop in my Stampin Up online shop.


Sunday, 10 January 2016

Christmas Card Club - Christmas Food


A new year it may be, but Christmas card making for our club challenges do not.  However the challenge set by Margaret our lovely organiser, is one that has challenged me today.  I don't have any Christmas Food stamps and so my trusty friend punch art has saved the day.

I love turkey at Christmas, but then I'm a bit of a traditionalist and our turkey usually comes from Field Farm Organics locally and cooked slowly overnight in the Aga is always delicious.

This card also reminded me of when our cheeky Border Collie stole what was left of our turkey on Boxing Day morning a couple of years ago.  Olivia caught him dragging the serving plate down the hall with the turkey on top neatly wrapped in tin foil.   Caught just in time me thinks!

The turkey is punched using the Stampin' Up! bird punch and I fashioned a cooking tin with silver foil card and made a table for it to sit on.   The window is in two layers.  I cut two matting layers one to be the backdrop for the scene which I cut just a rectangle out of the size of the inner window frame.  The second layer was smaller and I cut the whole frame out.  Before cutting I embossed both pieces using the Hardwood embossing folder, but inked it on one side with my brayer before putting it through the Big Shot just to add some toning.

A sprig of holly from some tag toppers I bought in the M&S a year ago and a simple sentiment and Christmas food is on the table.

Please do pop by the other ladies blogs in our group for lots more styles and inspiration on Christmas Food.

Zx

Weekly Christmas Card Challenges 6 - Anything goes 

Thursday, 26 November 2015

Stampin' Up! UK Spring Catalogue Sneak Peek

Stampin' Up! Botanical Gardens Suite is most definitely not just flowers.  It's also very easy to use other colours in addition to those included in the suite.  To make this card which I cased in part from the Stampin' Up! UK spring catalogue I used bermuda bay and lost lagoon as well as mint macaron from the suite of colours.

By adding some ink to a spritzer bottle you can create an original background along with some second generation stamping with Gorgeous Grunge.  You can add texture with  corrugated paper and the 'fern' leave works really well as a mask to develop even more depth to your card.

I like candy dots and am loving the white enamel dots for adding even more dimension and a little retired washi tape is great for attaching your topper.  You can stamp leaves onto watercolour paper in order that you can spritz very gently with water to blend the colour on the them.

This beautiful suite of products will be available from 5 January, but if you can't wait until then why not think about joining my team and then you can order this bundle in your starter kit from 3 December and be up and running for our big promotion in January.  Just contact me for more information if it's something you might be interested in doing either for the discount or for starting your own new business.  I have team across the UK and in The Netherlands so I'm sure we can find someone near to you for support, guidance and friendship.

More soon.

Zx

Saturday, 14 November 2015

Stampin' Up! Onstage Live More Swaps


Stampin' Up! has a great tradition of sharing ideas amongst demonstrators and so at events like Onstage we all make swaps and go around the event to share our swaps with other attendees whilst they share theirs with you.  It's a super way of boosting your mojo, getting ideas and seeing different styles.  I shared my first Stampin' Up! swap on Thursday and here's my second. A cute treat bag with a hand cream in each one.  I've altered some and used gold thread instead of the gold cord you see here and different sentiments all from the Stampin' Up! set Teeny Tiny Sentiments.  The bag itself is made using the Mini Treat Bag Thinlits dies.

Here's a 2 minute video to show you how to make one.

I know I'm having a fun day today as there is a general session today and this afternoon I'll be at an event called Centrestage where senior managers will be learning tips to help grow their business and help their teams grow theirs also.

Zx

Tuesday, 27 October 2015

Stampin' Up! Set The Wilderness Awaits


I've been playing with marker pens, water spritz and clear blocks to create fun backgrounds bursting with colour.  I've used black Staz On ink to add an image in this case the Mallard from Stampin' Up! set The Wilderness Awaits.  I've used the bold, but perfect autumn colours of Blackberry Bliss, Lost Lagoon, Mossy Meadow, Tangelo Twist and Hello Honey all part of the 2014-2016 Stampin' Up! In Colours.  My simple sentiment is from Teeny Tiny Sentiments and I've added some Into the Woods Elements which I coloured with the marker pens. the image is matted onto Mossy Meadow card stock and then on a base card of Blackberry Bliss which is textured with the Brick Wall 6" x 6" embossing folder.  Quick and easy for simple makes for masculine cards.

So to create the background
1. Colour stripes of different colours onto your clear block.
2. Spritz with water.
3. Stamp onto preferably water colour paper, but it worked ok for me here with whisper white
4. Allow to dry then add your image.

You can use any clear blocks, but there is a huge selection from Stampin' Up! and you can see them all in my stampin' up! online shop.

Enjoy playing.

Zx


Tuesday, 20 October 2015

Stampin' Up! Hearth and Home


I spent a fun day yesterday celebrating with several crafty friend the birthday of our lovely friend Lou.  You can visit her blog to see the fab things she makes with lots of LOTV stamps. She is a very talented lady.  

I showed them how to add ink to an embossing folder and had made a card for Lou using the same technique which I can now share with you.  I didn't realise either that she has a 'thing' about pumpkins so it turned out to be the perfect card for her.

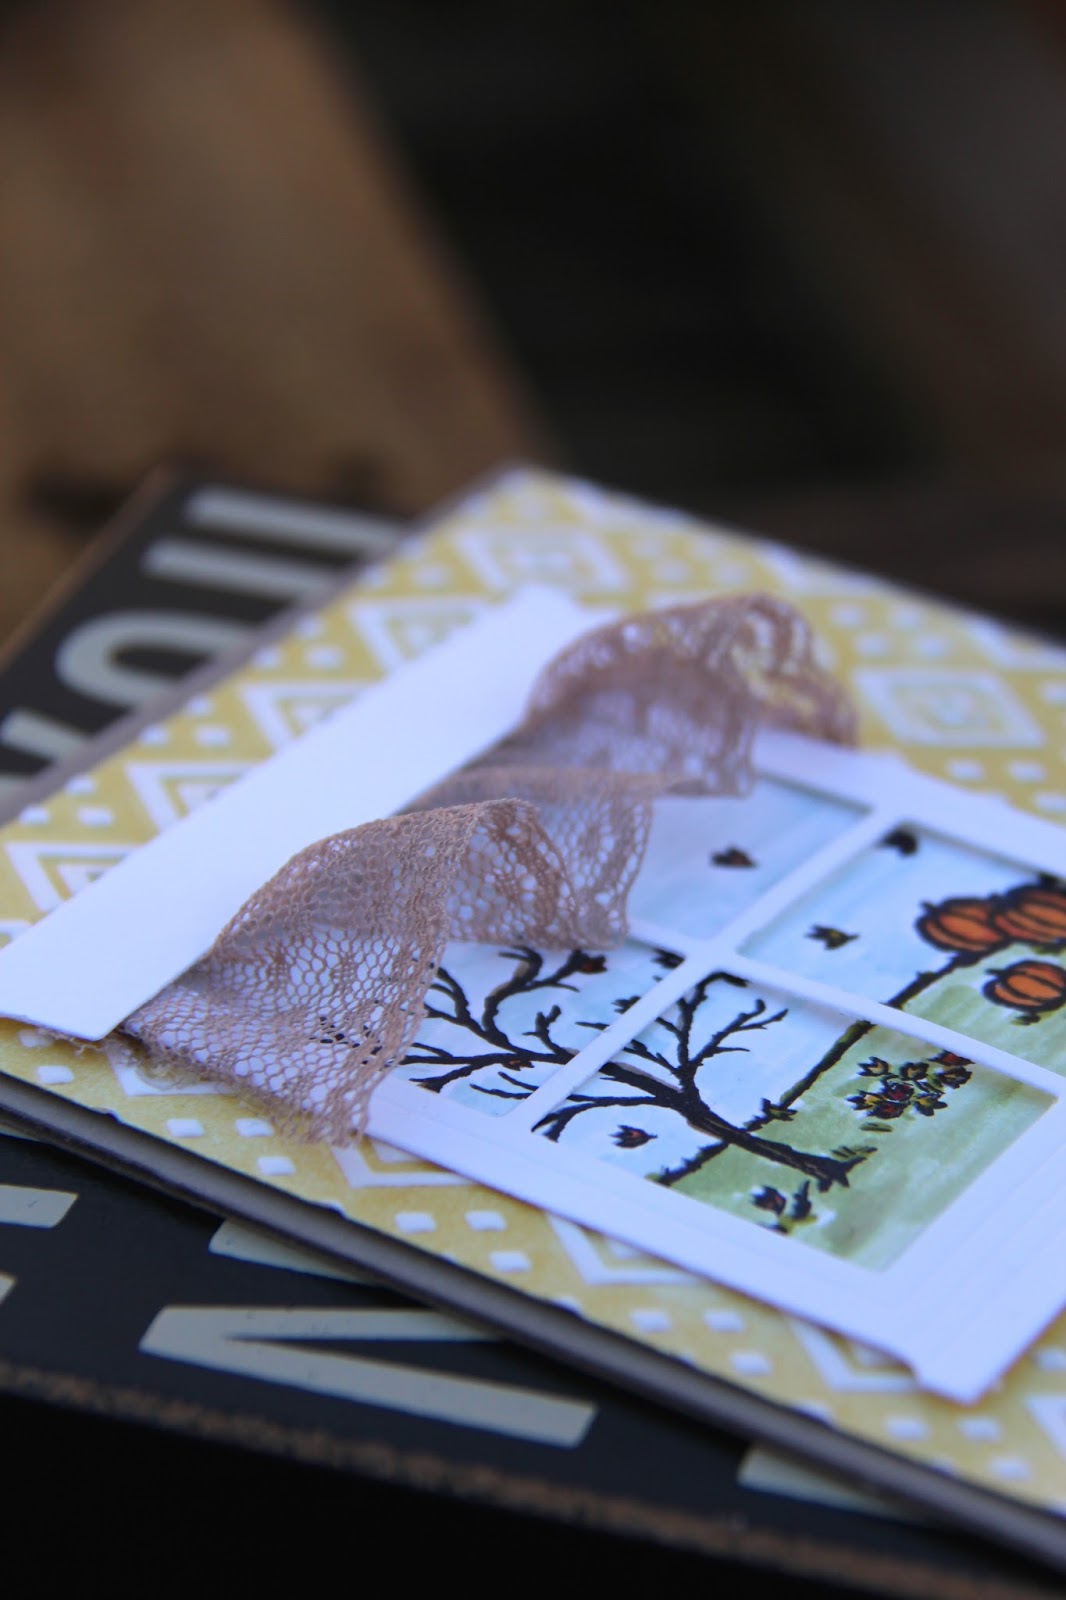
I used the Stampin' Up! stamp set Happy Scenes with the coordinating Thinlits  dies called Hearth and Home.  You may remember I made a couple of other cards using the Thinlits recently one which was looking out of the window and one is a Stampin' Up! Christmas card looking in. The popular choice is looking out I think.  Here I've gone for looking out and have used some of my favourite 'knicker' lace in tip top taupe to add a pelmet to my window frame.  I coloured the image behind with the Stampin' Up! marker pens having stamped the image with Staz On ink to stop the colours from bleeding once you colour.  I also used a blender pen to lift colour from a couple of ink pad lids to add the sky and grass.  

All that's left is to wish a continued wonderful birthday week and happy birthday to you if you are celebrating this week.

More soon Zx


Saturday, 12 September 2015

From the Garden

Just a quick post today to share a Happy Anniversary wish with my brother and sister in law.  We celebrate our anniversary's just a week apart, but we were a few years earlier.

Blushing Bride is such a lovely shade of pink and I find it is often one of my go to colours.  Here it's the base for my card featuring stamps from the Stampin' Up! set From the Garden and also papers from the set called English Garden which are absolutely beautiful.

Happy Anniversary Pete and Jude. We wish you a special day.

Hugs Zx

Sunday, 15 March 2015

Anything goes for Christmas Card Club


My first job today is to say HAPPY MOTHER'S DAY to each and every MUM out there.  I know I'm in for a special treat with my family and my parents so I hope you all have a very special day too!

As time marches on to Spring, you'll find me in another seasonal world i.e. Christmas for my card share today. Sylvie has set our challenge this fortnight and the theme chosen is 'Anything goes'. Not as easy as you might imagine with daffodils beginning to bloom in the garden and although cool several days of sunshine brightening everyone's spirits.

I was inspired by one of the Stampin' Up! Artisan Designer's cards fro my layout.  You can see her card here  I've used materials from the Stampin' Up! UK Spring catalogue including the Adventure Bound Designer Series Paper which is a mini stack and home to lots of prints including the log stack, pine needle with wooden board back drop and tartan and I've also popped in a stamped circle using the hardwood stamp.  The popular Festival of Trees is still in the spring catalogue along with the matching Tree punch which I've used to punch out my trio of trees.  I love adding texture so I've added some wooden cut out stars which were left overs from the Hooray It's Your Day project kit and a cute heart (essential wooden elements) with an epoxy star.  One of my all time versatile and useful stamp sets is Gorgeous Grunge which you can use to add speckles, spots or splodges.

Have a lovely day!
Hugs Zx

Challenges
Crafty Hazelnut's Extra Christmas Challenge - Anything goes
Holly Jolly Christmas Challenge - dies and punches


Monday, 15 September 2014

Stampin' Up! UK Wedding Ideas

 It's been rather too long since I blogged, but I've been suffering with my health for a long time and like most Mums I've soldiered on and put it down to motherhood, but recently discovered it was a little more than that and so slowly I'm on the mend. Nothing serious, but it's left me unable to keep up with life.  

That said Martin and I recently went to a friend's wedding. I knew the colour scheme as I was involved with the design and supply of materials.  I made her and her new hubby a card to match and wrapped the Project Life Album I made for them in similar colours, but used Stampin' Up! 's new Festive Designer Kraft paper rolls to wrap it in.  The flowers are made using the Spiral Flower Originals die on page 233 of the annual catalogue and the leaves are the retired Little Leaves sizzlit. 
Colours on the day were basic grey, smoky slate, blushing bride (how appropriate!!) and whisper white.  My card also features Teeny Tiny Sentiments and Gorgeous Grunge stamp sets along with a stencil made using the Hexagon Hive frame lit and Beautiful Wings embosslit for the butterflies.  

Please bare with me as I get more organised and back in control but do keep popping by to see my posts.  Thanks for your patience. 

Hugs Zx

Friday, 14 February 2014

Happy Valentine’s Day


IMG_7302
I just wanted to wish everyone a Very Happy Valentine’s Day!  I hope that everyone has someone to love them and someone to love. 
My card to you is from the Stampin’ Up! Simply Created Card Kit which is perfect for beginners and also for more experienced crafters who are busy and want to be able to make a quick card on the go!  See the kit in my Stampin’ Up! shop.
Have a LOVERLY day!
Zx

Monday, 10 June 2013

Boutique Blossom - Single Stamp from Stampin' Up!


You might have noticed in my sidebar the information about Single Stamps.  This gorgeous flower stamp is one of that very group. It's called Boutique Blossom and is available as a clear mount stamp until 31 August.  It's a mainly solid stamp and so it's great for trying out the rock and roll technique. 
ROCK AND ROLL TECHNIQUE
  • Choose two co-ordinating colours.
  • Ink your stamp in the lighter of two colours.
  • Roll the edges of the stamp on the darker of your two chosen colours.
  • Stamp your image to obtain a two-tone image. 
I used Elegant Eggplant and the soon to arrive C...... C..... for this example and I also added some Elegant Eggplant spots to the centre of the flower with a marker pen.  You'll also notice the embossing folder is new!  But you'll find out more about that in due course!  The border is stamped with the border stamp from Summer Silhouettes and punched with the scallop trim border punch.  A pleated doily, faceted button and whisper white bakers twine along with a spot of dazzling details (no matter how many times I took a picture of this card I just couldn't get the glitter detail or stop the whisper white glare so just believe me....!) add the embellishments and a sentiment from Teeny Tiny Sentiments with my new word window punch. Why new? Well those of you who know my craftroom now that it is a work in progress site 24/7 and so the old one........well it will live again one day I'm sure!!!
 Zx