My STAMPING PAPERCRAFT blog - Stamping Scene

Hello and welcome to my blog. I'm a paper craft addict and love sharing my passion for paper crafting . I run online and face to face card making, memory keeping and all sorts of 3D projects. I also sell many of the products I use. If you'd like more information do drop me an email. Thank you for visiting I hope to see you again soon. Zoe x
Showing posts with label watercolour technique. Show all posts

Friday, 25 July 2025

Watercolour Stamping Tutorial for paper crafting


Hi friends how's your week been?  Here I've been busy enjoying time out with friends,  walking dogs and enjoying son being home for a few days.  I've also been busy creating and really enjoyed tinkering with ink and water to create this month's Totally Technique card.  Annette my lovely dutch friend set the task for us to share watercolour stamping and it is fun. 

I really like the differing looks that just using these mediums can create and add in embossing folders and dies and there's lots you can do. 

The measurements are as follows

Fluid 100 watercolour paper whole sheet
Lost Lagoon card base 29.8 x 10.5 cm scored at 14.85 cm
Lost Lagoon matt layer embossed 9.7cm x 14cm
Lost Lagoon die cut rectangle start with 10.5cm x 14.8cm

All the extra details are included in the video.  If you enjoy watching please do subscribe to my channel and share with friends.  

You can use ribbon, rhinestones and die cut card to embellish or add some tiny bee trinkets and hand torn stamped two-tone cardstock.  Which do you prefer?


Enjoy your weekend

Hugs Zoe x

You are invited to the Inlinkz link party!

Click here to enter


Ends tonight

free shipping until 25 July 2025


Supplies used
natural botanicals stamp set #164831
#164831

painted stripes background rubber stamp

Painted Stripes background stamp 

lost lagoon cardstock


spritzer bottles pack of 2


Friday, 25 November 2022

Tips for using watercolour pencils for cardmaking with the Totally Techniques Team


tips for using watercolour pencils with full of love stampin up rubber stamps


The weather slipped into winter here in the UK, but at least as I type this the sun is shining and the sky is blue and I have a card to welcome you with cheery colours and pretty flowers from the Full of Love stamp set.  The Totally Techniques team members are sharing ideas for using watercolour pencils this month.  Our Stampin' Up! pencils come in two assortments so you can start with either depending upon your favourite colour choices and hopefully when you fall in love with them you'll want both assortments.  As with everything Stampin' Up! they coordinate with our colour families and so will coordinate with your card, ink and embellishments. 

use watercolour pencils for bright colouring on handmade cards
For my share today I started by stamping in black Staz On ink around the edge of a piece of Fluid 100 watercolour paper.  If you look at the stamp set below you'll see that I used the stamp with the letter in the centre and only partially stamped on the border of the paper.  

I then used the pencils to add some colour to the image but not completely covering it.  You can create light and shade by the level of pressure you put on your pencil in the first place and then using a blending pen can drag colour to the uncoloured areas of a flower or leaf.  This reduces the intensity of the colour, but also can leave bold colour on the original application. The great thing is that you can use various shades of one colour also to blend with the pen to create even more depth or you can use a single colour.  The next step is to use a mixture of colours, but I didn't need to do that with my design as the single colours worked really well giving bold and pretty contrasts to each element. 
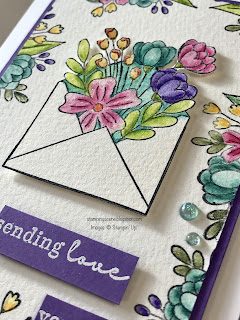
Once I had coloured the outer border I set to on the focal envelope.  I stamped this on an additional piece of watercolour paper and coloured it before fussy cutting the image out.  I've then stuck it onto the middle of my border piece raising it up with Stampin' dimensionals. My sentiment is from the same set and is simply white heat embossed onto a piece of Gorgeous Grape card to connect with my matt layer of the same colour.

The pencils are very cheap way to grow your colour spectrum and all you need is a good pencil sharper and possibly a stamp case to keep them safe.  It's best not to drop them to protect the colour inside the pencil.  I would never claim to be a great colourer but I'm very pleased with how this turned out and very minimal colouring skill is required so great for beginners and more experienced crafters to use.  

For regular readers to my blog you'll know I like a little bling so my finishing touch was to add some Wink of Stella which you can just about spot in the final picture and so

You are invited to the Inlinkz link party!

Click here to enter
me In-color opal rounds.  

Thanks for stopping by and enjoy the hop via the thumbnails or link below. 

Happy weekend Zoe x


Supplies Used available in my Stampin' Up! shop

full of love stamp set with zoe tant

Full of Love stamp set


watercoloring pencils for colouring

Watercolour Pencils 


Blender pens for use with watercolour pencils and water based ink pads

Blender Pens


fluid 100 watercolour paper

Fluid 100 watercolour paper


2021-2023 in color opal rounds embellishments for craft

in color opal rounds


Friday, 30 December 2016

Stampin Up UK Spring Catalogue Sneak Peek for Totally Techniques Blog Hop


Stampin' Up! Spring Catalogue Sealed with Love watercolour technique


Stampin Up UK will launch it's new Spring catalogue on 4 January and so I've used a sneak peek stamp set Sealed with Love for my card in this month's Totally Techniques Blog Hop.  The technique to use a watercolour wash and I've played about with several shades of Stampin' Up! blues as well as the bold melon mambo.  It seems a little odd to be sharing a Valentine card, but truth is it will be Valentine's day before you know it and this stamp set with its coordinating frame lits is perfect for your expressions of love for someone special.  There's more stampin up sneak peeks here.


To create the wash I first stamped the sentiment in versa mark ink and then heat embossed it with whisper white embossing powder.  Be sure to get your heat gun hot before actually using it to melt the powder and then heat it from below and above to reduce to amount of bowing of your watercolour card.  I then used painters masking tape along all sides of the card to attached it to a piece of thick card board out of the back of a specialty DSP pack.  This again helps to reduce warping once you get the card stock wet.  I used various widths of paint brush to first add plenty of water to a section where i wanted to add ink from a palette where i had added drops of Stampin' Up! re-inkers.  Use kitchen paper to remove excess ink and water and let the card stock dry between each addition of water and ink.  You can speed the process by carefully using a heat gun, but as mentioned above make sure it is hot before it goes near the card stock for maximum effect in the least amount of time.  You can then use different shades of ink to colour wash.

Check out all the other lovely examples of water colour wash by visiting my lovely Stampin' Up! friends around the globe.

1.  Patrice Halliday-Larsen New Zealand
2. Amy Koenders - USA
3. Shannean Moncrieff Australia
4. Nadine Weiner - Germany
5.  Zoe Tant - that's me

Thanks for visiting.

Zoe x


SaveSave