My STAMPING PAPERCRAFT blog - Stamping Scene

Hello and welcome to my blog. I'm a paper craft addict and love sharing my passion for paper crafting . I run online and face to face card making, memory keeping and all sorts of 3D projects. I also sell many of the products I use. If you'd like more information do drop me an email. Thank you for visiting I hope to see you again soon. Zoe x
Showing posts with label papercraft blog hop. Show all posts

Friday, 27 September 2024

How to do Ghost Stamping for card-making


It's been a very wet week here and I'm now glad that for a short while there is no wind or rain and the sun is shining.  I believe it is due to last a couple of days and so let's enjoy it.  However you've found the right place for some crafting inspiration if you are stuck indoors with wet windy weather.  Our Totally Techniques team are sharing one form of Ghost Stamping.  

It's something I had never done before and I enjoyed getting inky to create some fun simple cards with a different texture.  I also used a selection of background stamps that I love to use but often forget to pull off my shelf.  

All you really need is a pigment white ink pad,  white card, a background or line image stamp and then a solid image or background stamp.  You'll also want some different colour inkpads  which can be all different colours or the same colour in different shades.  You don't need much else other than a base card and any embellishments or sentiments you may wish to add.  This is really simple with subtle results, but enhancing results and I think  you will enjoy having a go.  

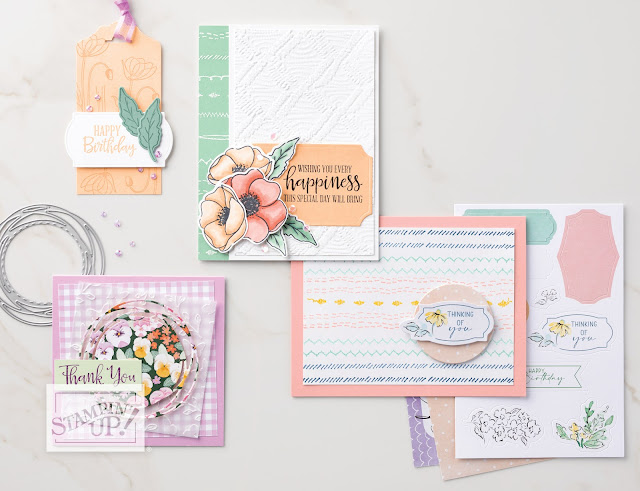
For the above card you'll want colours similar to Garden Green, Lemon Lime twist, Azure Afternoon, Misty Moonlight and white pigment ink. 

You can find out how to create the ghost stamping effect in the video below.  


From background stamps to add the colour you can also move to using smaller stamps like these from the Iconic Imagery Stampin' Up! bundle.   Use all the different elements to create a seasonal background of your own and then just add sentiments to share your festive message. 

For this you'll need colours similar to Poppy Parade, Garden Green, Lemon Lime Twist, Lemon Lolly, white pigment ink and black card. 


christmas cards handmade using background and seasonal images and ink pads


ghost stamping when a paler pigment ink shows through a coloured ink


Give this technique a try because you'll definitely enjoy trying it out with different colours and stamps.  Also take a look at my global Stampin' Up! friends on our blog hop by clicking on the icons below to look at their makes with this technique.  

Thanks for popping by and did I mention that next month we'll have a Kit sale.  30% off all kits in the Kits Collection.  Look under Online exclusives to find them.  

See you soon.
Zoe x

You are invited to the Inlinkz link party!

Click here to enter


Supplies Used

Iconic Imagery stamp and die set bundle
Iconic Imagery 


Leaf Collection stamp set stampin up


Plaid stamp for rubber stamping with ink pads
 Sketched Plaid 


Uninked Craft white pigment ink pad for embossing ghost stampin
Un-inked stampin pad with craft white pigment ink with refill


Deckle edge layering rectangle dies for papercraft
Deckle Edge Rectangle Dies

Friday, 25 November 2022

Tips for using watercolour pencils for cardmaking with the Totally Techniques Team


tips for using watercolour pencils with full of love stampin up rubber stamps


The weather slipped into winter here in the UK, but at least as I type this the sun is shining and the sky is blue and I have a card to welcome you with cheery colours and pretty flowers from the Full of Love stamp set.  The Totally Techniques team members are sharing ideas for using watercolour pencils this month.  Our Stampin' Up! pencils come in two assortments so you can start with either depending upon your favourite colour choices and hopefully when you fall in love with them you'll want both assortments.  As with everything Stampin' Up! they coordinate with our colour families and so will coordinate with your card, ink and embellishments. 

use watercolour pencils for bright colouring on handmade cards
For my share today I started by stamping in black Staz On ink around the edge of a piece of Fluid 100 watercolour paper.  If you look at the stamp set below you'll see that I used the stamp with the letter in the centre and only partially stamped on the border of the paper.  

I then used the pencils to add some colour to the image but not completely covering it.  You can create light and shade by the level of pressure you put on your pencil in the first place and then using a blending pen can drag colour to the uncoloured areas of a flower or leaf.  This reduces the intensity of the colour, but also can leave bold colour on the original application. The great thing is that you can use various shades of one colour also to blend with the pen to create even more depth or you can use a single colour.  The next step is to use a mixture of colours, but I didn't need to do that with my design as the single colours worked really well giving bold and pretty contrasts to each element. 
Once I had coloured the outer border I set to on the focal envelope.  I stamped this on an additional piece of watercolour paper and coloured it before fussy cutting the image out.  I've then stuck it onto the middle of my border piece raising it up with Stampin' dimensionals. My sentiment is from the same set and is simply white heat embossed onto a piece of Gorgeous Grape card to connect with my matt layer of the same colour.

The pencils are very cheap way to grow your colour spectrum and all you need is a good pencil sharper and possibly a stamp case to keep them safe.  It's best not to drop them to protect the colour inside the pencil.  I would never claim to be a great colourer but I'm very pleased with how this turned out and very minimal colouring skill is required so great for beginners and more experienced crafters to use.  

For regular readers to my blog you'll know I like a little bling so my finishing touch was to add some Wink of Stella which you can just about spot in the final picture and so

You are invited to the Inlinkz link party!

Click here to enter
me In-color opal rounds.  

Thanks for stopping by and enjoy the hop via the thumbnails or link below. 

Happy weekend Zoe x


Supplies Used available in my Stampin' Up! shop

full of love stamp set with zoe tant

Full of Love stamp set


watercoloring pencils for colouring

Watercolour Pencils 


Blender pens for use with watercolour pencils and water based ink pads

Blender Pens


fluid 100 watercolour paper

Fluid 100 watercolour paper


2021-2023 in color opal rounds embellishments for craft

in color opal rounds


Wednesday, 16 March 2022

New at SU with Stampin' Up! Tulip Fields


new at Stampin Up SU blog hop banner


Hi and welcome to the New at SU, international Stampin' Up! demonstrator blog hop for March 2022.  You may have just come from Anke's blog where she has shared a fabulous card using the Flowing Flowers stamp set because this month we are CASEing annual catalogue (AC) designs, but using stamps and products featured in our Spring Mini catalogue for 2022.  

I'm CASEing a card from page 25 in the AC and have used the sentiment free stamp set Tulip Fields.  It is a super set for colourful spring cards and I don't know about you, but I love spring flowers in particular Tulips.   The colours are so amazing and plentiful.  


I also used the Flowering Fields DSP and the Gingham embossing folder.  Both are in the spring mini.  I stamped the scene using a paper mask I created with the windmill stamp. I die cut it using the Layering Circles dies.  To add some depth I stamped and fussy cut the building part of the windmill and raised it with Stampin' Up! dimensionals and I used Stampin' Blends to add some touches of colour to my black and white image.  
I used a piece of Petal Pink card for the background rectangle, but wanted it to tone in a little more with the tulips on the paper so I used a blending brush to gently add some Calypso Coral Ink. 

The fun sentiment is from a demonstrator stamp set called Stamping Your Way to The Top which you can buy when you join Stampin' Up!.  I fussy cut it and it creates a cheery card to send to a friend.  Let's face it we all prefer a card via snail mail than a bill or email if we are honest.  
stamping your way to the top sentiment set for stampin up demonstrators

Can you spot the card I case'd?

stampin up ac © images

Thanks for stopping by on your way around the hop and if you haven't done a blog hop before please follow the Next buttons to see some more inspiration.  

Keep safe and keep stamping

Zoe x

next button for new at su blog hop stampin up

BLOG HOP Roll call LIST
SHOPPING LIST FOR Tulip Fields card

Tulip Fields stamp set stampin up with zoe tant uk


tulip patterned papers from stampin up 2022


gingham embossing folder for papercraft


stitched so sweetly dies for papercraft


layering circle papercraft dies stampin up


Friday, 31 January 2020

#simplestamping - simple technique for all


It's the first outing for the Totally Techniques Design Team of 2020 and we're starting the new year with a very simple, but effective one that anyone can try - #simplestamping

I've used the Honey Bee stamp set from the Spring mini which is proving to be a popular set especially when you can get a set of Golden Honey designer series papers for free when you spend £45.  However today I have used black and white card stock with white craft ink or Basic Grey respectively.  

The above card was an afterthought having made the white card version below first. I'm thinking that I prefer the above version but they both work. 

On both cards I've added some Noble Peacock rhinestones and a matting layer of the same colour as the base card.   This bee stamp is part of the distINKtive range of stamps that Stampin' Up! has been sharing in the last couple of years which means it creates texture and fine detail by just stamping with one of the stamps from the set. I love this stamp it is a real WOW all on it's own. The sentiment is from the same set.  I also added a whisper white matt layer inside and added a bee stamped in Tuxedo Black Memento ink. 


You'll find lots of inspiration from all our design team members so please do visit by clicking around the links at the bottom of this post.  

In the mean time don't forget it is Saleabration at Stampin' Up! until 31 March and you'll get a free gift with purchase for every £45 spent (excl. P&P).  You can see all the gifts and shop for products in my online shop. 


Thanks for visiting and please come back tomorrow for the Moving Along with the Times challenge as I'll be sharing more inspiration for the Honey Bee stamp set.  

Happy Stamping 
Zoe x


Happy Little Stampers - CAS challenge - Positive


You are invited to the Inlinkz link party!
Click here to enter