

It's time for the June Thinking Outside the Box Design Team Blog Hop. Welcome to the team's share of folded envelope tutorials. I've gone for the very simple and well known 'diaper' pouch which sounds marginally better as a tutorial name than a 'nappy' pouch but it is an easy, easy project and one I regularly share with ladies groups or indeed with children as they love paper folding and also the fact that treats go inside this cute packaging.
Step 1
So to get started all you need is a square of patterned or indeed plain paper. You'll see I have done two versions one for kids and one for the grown ups. The smaller kids pouch started as a piece of 4" x 4" designer series paper. The adult version is a piece that is 6" x 6".

Step 2
Fold your piece of paper diagonally to form a triangle.

Step 3
Taking the top layer of the paper fold the top point down towards the fold leaving a gap of 1/2" (1cm) approximately.

Step 4
Fold the flap you created back up to the triangle postion then bring in one side of the triangle to run along the fold created by the flap in stage 3.

Step 5
Do the same with the other side.

Step 6
Bring the flap created earlier down over the top finishing the pouch.

Step 7
Decorate your pouch

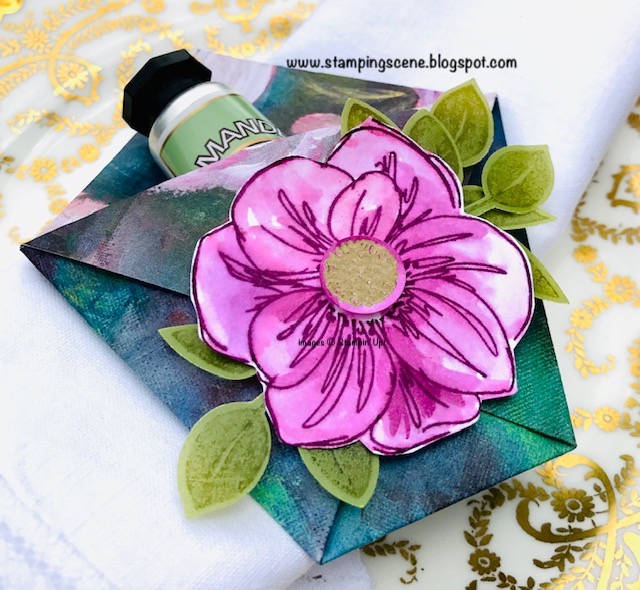
For my decoration I have used the new Stampin' Up! Floral Essence stamp set. I stamped the large outline flower onto whisper white card with Blackberry Bliss ink. Before it dried too much I used an aqua painted to carefully pull in some of the outline ink to colour the flower. It gives a watercolour effect. I heat embossed the centre of the flower with gold embossing powder and punched it out before again using the aqua painter to just colour the remaining smidges of white card. You can dab off excess ink and water with a paper towel.
TIP Keep the flow of water in the aqua painter to the minimum as it is only ordinary card and you could get bubbles and soggy card. If you prefer use watercolour paper.
The leaves were stamped onto Perennial Essence vellum with Old Olive ink and punched out with the leaf punch.
These pounches are great for table favours for any event and depending on your paper size you can add a gift of choice. I've added a mini handcream.
For the children you can make mini pouches and snip a small triangle at the bottom to all for a lolly stick to be slotted through the bottom. This too was decorated with Floral Essence with the flower and leaves being stamped and the leaves coloured in the same way as above.


Thanks for stopping by Stampingscene today.
Happy crafting
Zoe x

1. Tanja Kolar
2. Zoe Tant - You're Here
4. Beate Wacker
5. Aude Barbara
6. Barb Stewart
7. Fiona Carson

5 comments:
Oh I'm liking this Zoe, simple and easy to make and you've used gorgeous papers, Kate x
Love your colour choices and sweet projects Zoe!
Love your colour choices and sweet projects Zoe!
Thanks Ladies for your kind comments. Glad you like my design. Zoe x
Hello Zoe. Love your designs. Papers are stunning and the gift ideas are fab. Hugs Rita xx
Post a Comment