My STAMPING PAPERCRAFT blog - Stamping Scene

Hello and welcome to my blog. I'm a paper craft addict and love sharing my passion for paper crafting . I run online and face to face card making, memory keeping and all sorts of 3D projects. I also sell many of the products I use. If you'd like more information do drop me an email. Thank you for visiting I hope to see you again soon. Zoe x
Showing posts with label stampin up uk demo blog. Show all posts

Friday, 23 April 2021

New product sneak peek


lots of leaves dies for card making from stampin up with zoe tant
Oh I so hope it is a beautiful day with you too. The sun is shining here and the field behind our house is slowly turning yellow as the flowers bloom on the Rape crop.  Happy Friday all!

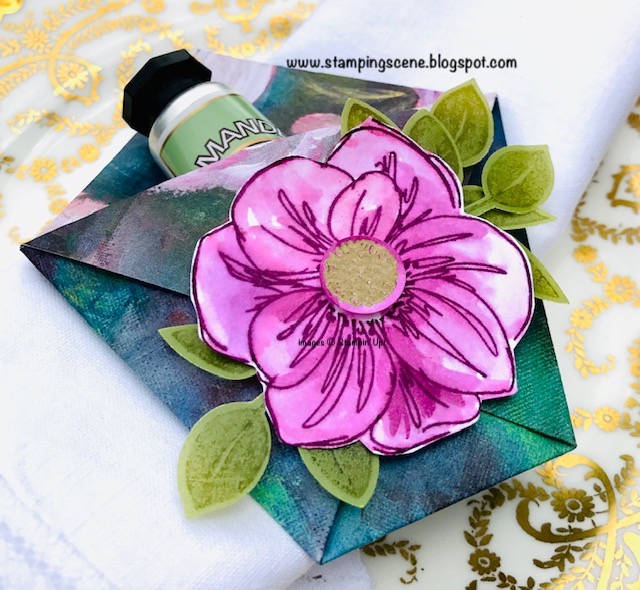
Today I have a sneak peek card for you showing some returning products and also a taste of new.  I love the Stitched Leaf dies from the winter mini and am delighted they will return in the new annual catalogue. In this card I have showcased the leaf shapes and used some fun cheerful colours to match the day.  The centre stage front leaf is a sneak of a new colour and check out the patterned papers and white die cut frame.  

I'm about to post out new catalogues to everyone who has ordered from me in the past 6 months, but if you are new to Stampin' Up! or would like a catalogue please do email me at zoetant@live.co.uk to arrange your copy.  

Also you might want to know that you could earn these fabulous papers which come in a mega mixed stack of 24 designs to suit lots and lots of scrapbook or card making projects.  You can earn them FREE with a qualifying order or gather with friends, collect orders together and you could keep them for yourself or share with friends as there are 4 each of 12 double sided designs.  Now that would make it worth getting together and if you'd like I share a make and take pack for you all and a zoom slot to gather and see even more sneak peeks.  

In May there are also extra bonuses for hosts and anyone with a shopping list as long as your little finger might prefer to join and benefit from discount shopping, crafting with others, craft community and more. 

Just get in touch to find out more.

Keep safe and have a fabulous weekend 

Hugs Zoe x

basic white card stock from stampin up with zoe tant demo uk

basic white card stock


frosted and clear epoxy droplets for paper craft

Frosted and Clear Epoxy droplets


Friday, 30 October 2020

How to do inking on embossing folders tutorial blog hop

handmade thank you card using stampin up love of leaves
Love of Leaves and Stitched Leaves Dies from Stampin' Up! 


totally techniques international stampin up demonstrator blog hop logo

Here is a simple stamping technique that you will love and is really easy to achieve.  I chose this technique for our monthly International Stampin' Up! demonstrator blog hop this month and I hope you like it as much as I do. 

handmade thank you cards using the stampin up love of leaves stamps and dies

ink on embossing folder technique for paper crafting
In its simplest form of the technique you need to add ink to one side of an embossing folder, add your card and put through your die cutting machine. That is what I did for these cards using just one ink, one stamp set and one die set and embossing folder.  I used a sponge brayer to add ink to my Dainty Diamonds 3D embossing folder before placing a piece of white card on the unlinked side to pass the closed embossing folder through my die cutting machine.  You can experiment and use either side of the folder to create a pattern with ink on the embossed section or in the debossed section.  You can see the difference with this particular folder below.  I used Old Olive ink.  

ink on embossing folder technique for paper crafting
 Once you have your inked embossed pieces you can use them as a background, die cut them, add them as a matt layer or whatever works for your project.  I die cut leaves which I then used on some cards and also used the negative remaining and used the stitched vein die to add the detail to the leaf aperture negative. 


die cutting leaves for craft projects with stampin up stitched leaves dies


You can use the outside piece of the cutting die to make sure the stitched part is in the correct place either directly on your card base or on an additional piece of matting card that you can then use sticky foam pads to raise the embossed layer over the top. 

handmade stampin up thank you card using love of leaves

Using a single colour can be very effective and is also a great project if you don't have a big supply of colours.  I used the die cut leaves to create more cards and part of the die set includes a stitched pattern die that just does what it says marks a stitched pattern without cutting anything out except for the stitching.  It acts as a simple background to show case the pretty leaf cut from the card above. 

handmade stampin up thank you card using love of leaves

I also added some Old Olive ribbon just looped under the leaf here and alcohol marker of the same colour again to colour the clear epoxy droplets to pop a little more colour and make them show more on the white card base.  

I used the Woodland embossing folder for a couple of versions of this technique.  You can see a masculine Woodland embossing folder card or a Woodland gift box.

As I said it can be as simple a technique as you want to make it and using different folders and ink colours can change the whole look.  

Tomorrow is the last day of the Designer Series Paper sale with 15% off selected paper packs. If you haven't ordered your favourites yet be sure to get a saving ordering this month. 


Thanks for dropping by and enjoy the blog hop with more inspiration via the links at the bottom of this post. 

Keep safe and keep stamping 
Zoe x


Stampin Up love of leaves bundle


Love of Leaves Bundle


stampin up dainty diamonds 3D embossing folder

Dainty Diamonds 3D embossing folder


stampin up sponge brayers

sponge brayers


old olive ink pad stampin up

Old Olive Ink Pad


frosted and clear epoxy droplets stampin up

Frosted and clear epoxy droplets


Blog Hop Links Below


You are invited to the Inlinkz link party!

Click here to enter

Friday, 29 November 2019

Tone on Tone a very simple technique for paper crafters


For our November technique share we have picked something that is really simple that beginners right through to avid crafters can so with minimum fuss and bother.  It is the tone on tone technique and you can achieve great results with #simplestamping and just one colour of ink or indeed a Versamark clear emboss pad.  

It's been so depressing weather wise in the UK that I've taken out my Butterfly Gala stamp set which I haven't used in a long while and some pretty Subtle collection inks and card stock.  

I first cut a matt layer for my card which is measured at 10cm x 14.3cm.  I made three of the same card in different colours.  I started with Soft Sea Foam.  Using a solid small butterfly stamp from the set I stamped randomly around the edge to add some detail. 

For my design layer I used another piece of Soft Sea Foam cut at 9.5cm x 13.8cm.
 
For this part I stamped the various outline butterfly duo stamps across the card making sure to stamp them going off the card as this helps draw the eye across the design.  In some cases I just ink the big or small butterfly to mix them up on the design even more.  They are all stamped in Soft Sea Foam ink hence the term 'tone on tone' which sometimes folk assume wont work, but you are in effect adding ink and therefore create darker shades of the same colour by adding this ink layer.  You can also create a similar effect using a clear Versamark ink pad which then gives a watermark effect.  This tends to work best on lighter colours though.  I also wanted to define the two layers of card so with this layer I swiped the edges of the card across the ink pad  a couple of times to add shading to the very edge of the card.   I then stuck the two layers together and stuck them to a base card of thick whisper white card.  


My next step was to stamp on whisper white card in Soft Sea Foam ink, a butterfly duo and use the matching punch to cut out the images.  I layered them with glue dots and Stampin' dimensionals.  They were added to the card along with a sentiment from the Stampin' Up! Butterfly Gala stamp set which I punched out with the Classic Label punch. 

A finishing touch was to stamp the same butterly duo onto the envelope flap.  Folk in Stampin' Up! never like to send naked envelopes and at the very least it brightens the post deliverers day and theat of the recipient.

Cards like this are very quick and easy, but you could jazz them up depending upon your time and supplies.  The nice thing too is that they work in just about any colour and can be a fabulous background for a more detailed design.  

Have a go and see what you come up with.  Remember too that you can buy all the supplies for these three cards in Zoe's Stampin' Up! online shop.


You can get more inspiration for this simple technique by visiting each of the thumbnails below.  Enjoy our Totally Techniques Design Team Blog Hop.  

Thanks for popping by Zoe xx


You are invited to the Inlinkz link party!

Click here to enter

Friday, 28 June 2019

This Little Piggy - Danced a little jig


For our June my fab friend Kelly Acheson in the USA has chosen No Line Watercolouring for our technique in our international Stampin' Up! demonstrator blog hop.  I haven't used this technique very often so I'm learning with you.  I am quite happy with my Little Piggy dancing a jig though. I teamed my watercoloured image with one of the new Heirloom embossing folders and it's coordinating Heirloom framelit.  They are really easy to use and create either an oval or rectangular frame which could be used for cards like this or photo frames or scrapbooking.  The possibilities are endless. I created my frame with my new fave colour Pretty Peacock and matted it onto a Very Vanilla embossed layer too.  This was embossed with the 3D Tin Tile folder.   

To show you the basics of no line watercolouring I have taken some pictures whilst using the technique with this pot of paintbrushes from Stampin' Up! set Crafting Forever.  
Step 1
Ink your stamp with a very pale colour like Sahara Sand or Petal Pink. Stamp off on grid paper a couple of times leaving very little ink on your stamp and then stamp onto watercolour or shimmery white paper.  


Step 2
You'll have an only just visible image and you can now use ink from the inside of your ink pad lids to colour your image.  You may need to blend colours on an acetate sheet or clear block.  I find that painting the section I wish to colour first with water only from my aqua painter then allows the ink to flow and cover the moistened section.  You can remove excess water with a paper towel.


Step 3

You can once you've finished a section dry your image with a heat tool to set the colour.  

You can then come back and add shading neat ink that you can wash with the aqua painter to create shading. 
This is where I come unstuck as I'm not very patient and you need to be to build up the coloured sections and complete the image. 
You need to try to work on sections not connected to avoid bleeding of the colours so with this image move from one paintbrush on the right to another on the left and so on.  Mop off excess water and revisit each section when dry.  I also find having one aqua painter for just adding water and one for adding ink works well.  You can clean the inky one on kitchen paper between colours.  It is very satisfying and for me will need more practice, but you can become a faux artist and have fun colouring in.


Please visit the other ladies in the hop as I know some of them will be far more skilful than me. To see their designs click on each picture link below. 

Thanks for visiting and I'll be back with more designs and tips soon. 

Happy crafting 
Zoe x


You are invited to the Inlinkz link party!
Click here to enter

Saturday, 22 June 2019

Thinking Outside the Box - We're making folded envelopes


It's time for the June Thinking Outside the Box Design Team Blog Hop.  Welcome to the team's share of folded envelope tutorials.  I've gone for the very simple and well known 'diaper' pouch which sounds marginally better as a tutorial name than a 'nappy' pouch but it is an easy, easy project and one I regularly share with ladies groups or indeed with children as they love paper folding and also the fact that treats go inside this cute packaging.

Step 1
So to get started all you need is a square of patterned or indeed plain paper.  You'll see I have done two versions one for kids and one for the grown ups. The smaller kids pouch started as a piece of 4" x 4" designer series paper.  The adult version is a piece that is 6" x 6".


Step 2

Fold your piece of paper diagonally to form a triangle.
Step 3

Taking the top layer of the paper fold the top point down towards the fold leaving a gap of 1/2" (1cm) approximately. 

Step 4

Fold the flap you created back up to the triangle postion then bring in one side of the triangle to run along the fold created by the flap in stage 3. 


Step 5
Do the same with the other side.
Step 6 
Bring the flap created earlier down over the top finishing the pouch. 
Step 7 
Decorate your pouch


For my decoration I have used the new Stampin' Up!  Floral Essence stamp set.  I stamped the large outline flower onto whisper white card with Blackberry Bliss ink. Before it dried too much I used an aqua painted to carefully pull in some of the outline ink to colour the flower.  It gives a watercolour effect. I heat embossed the centre of the flower with gold embossing powder and punched it out before again using the aqua painter to just colour the remaining smidges of white card.  You can dab off excess ink and water with a paper towel.

TIP Keep the flow of water in the aqua painter to the minimum as it is only ordinary card and you could get bubbles and soggy card.  If you prefer use watercolour paper. 

The leaves were stamped onto Perennial Essence vellum with Old Olive ink  and punched out with the leaf punch.

These pounches are great for table favours for any event and depending on your paper size you can add a gift of choice.  I've added a mini handcream.

For the children you can make mini pouches and snip a small triangle at the bottom to all for a lolly stick to be slotted through the bottom.  This too was decorated with Floral Essence  with the flower and leaves being stamped and the leaves coloured in the same way as above.

 I hope you'll give them a try and don't forget to visit the other global Stampin' Up! demonstrators to see their tutorials and inspo for you.


To shop for any of the products used you can visit my Stampin' Up! online shop.

Thanks for stopping by Stampingscene today.

Happy crafting
Zoe x


2. Zoe Tant - You're Here


Thursday, 15 March 2018

Easter - Join us at Moving Along with the Times Challenge

Easter Basket with Stampin Up Delightful Daisy Designer Series papers and a 'CHICK'

Easter is our challenge theme at Moving Along with the Times this fortnight.  You can see mine and the other DT designs here.  We'd love you to join in our challenge which is almost as easy as Anything Goes, just needs to have an Easter theme running through it.

I made this basket following on from a youtube tutorial I shared a couple of weeks back.  You can click   Easter Basket tutorial to see the video and other ideas for decorating it.

To make this one I used the Delightful Daisy papers from the Stampin Up annual catalogue which are really popular along with the stamp set Daisy Delight.  Night of navy gingham ribbon is tied in 'bunny ear' bows and attached to the handle with glue dots. You can also add a tag and slot it in the side panel on the basket.  In the dimensions in my video tutorial you end up with a basket that is 3 inches wide and deep.  It's just the right size for mini eggs or a larger single egg.

If you would like it slightly smaller then you can used a piece of A4 card cut to 21cm x 28cm and then score at every 7cm on each side before following the instructions in the video.

Here's a trio of cards with the matching Stampin Up set Daisy Delight and the daisy punch.


Don't forget to join in the challenge and share your Easter projects over Moving Along with the Times.


Thanks for visiting today 
Hugs Zoe x


Saturday, 30 April 2016

Happy Birthday Bakers Box

Oh wow at last today in Lincolnshire the sun is shining and it has a little warmth. Hopefully Spring is coming back instead of Winter extending.

Today I have a cute Stampin' Up! baker's box to share with you and there's a little sneak peek of some of the new in colours coming in the new annual catalogue in June.  The bold designer series paper is called Playful Palette and is a 6" x 6" stack.  The sentiment is from new stamp set Confetti Celebration.

I'm already loving these bright designs!

Have a great day and if you're somewhere that has a long weekend like we do in the UK with a bank holiday on Monday have fun and enjoy the sunshine.

Zx

Wednesday, 27 April 2016

Stampin' Up! Grand Vacation Blog Hop - Baby Love


I can't believe a month has passed since the last Mediterranean Acheivers Blog Hop.  Welcome wherever you've come from today to our Baby Love theme hop.

I finally caved and bought the fab Stampin Up set Made with Love to make these cards and I've enjoyed it so much I've made more which I'll add to my for sale boxes.  It really is a cute set and leads to some fab cute cards.


For the baby boy card I used some thick whisper white card stock and put the patterned designer series paper on the inside rather than the front.  I've turned back the top corner revealing the paper inside.  I stamped the baby grow in mint macaron and then used marker pens to colour it.  I'm sad to see the triple punch pack go with the cute little star, but couldn't resist using it here as all babies are little stars and of course made with love.


My baby girl card is uber cute with the cute little dear and some stamping from the I love You Sew hostess set in the spring catalogue.  A little washi tape and some silver, clear and white sequin hearts made for this sweet card.  Again a touch of subtles DSP just to remind you it's for a pink baby i.e. girl

I encourage you to visit the other blogs on the list below to see lots of fabulous inspiration for baby cards and more.  Enjoy the hop.  You're currently with me Zoe Tant

If you've seen any products that you like the look of you can buy them in my online shop.


See you again soon.
Zx