My STAMPING PAPERCRAFT blog - Stamping Scene

Hello and welcome to my blog. I'm a paper craft addict and love sharing my passion for paper crafting . I run online and face to face card making, memory keeping and all sorts of 3D projects. I also sell many of the products I use. If you'd like more information do drop me an email. Thank you for visiting I hope to see you again soon. Zoe x
Showing posts with label craft for kids. Show all posts

Saturday, 22 June 2019

Thinking Outside the Box - We're making folded envelopes


It's time for the June Thinking Outside the Box Design Team Blog Hop.  Welcome to the team's share of folded envelope tutorials.  I've gone for the very simple and well known 'diaper' pouch which sounds marginally better as a tutorial name than a 'nappy' pouch but it is an easy, easy project and one I regularly share with ladies groups or indeed with children as they love paper folding and also the fact that treats go inside this cute packaging.

Step 1
So to get started all you need is a square of patterned or indeed plain paper.  You'll see I have done two versions one for kids and one for the grown ups. The smaller kids pouch started as a piece of 4" x 4" designer series paper.  The adult version is a piece that is 6" x 6".


Step 2

Fold your piece of paper diagonally to form a triangle.
Step 3

Taking the top layer of the paper fold the top point down towards the fold leaving a gap of 1/2" (1cm) approximately. 

Step 4

Fold the flap you created back up to the triangle postion then bring in one side of the triangle to run along the fold created by the flap in stage 3. 


Step 5
Do the same with the other side.
Step 6 
Bring the flap created earlier down over the top finishing the pouch. 
Step 7 
Decorate your pouch


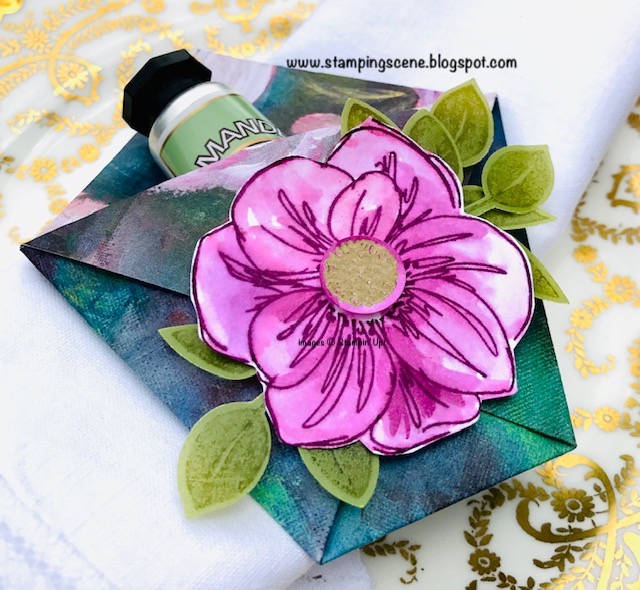
For my decoration I have used the new Stampin' Up!  Floral Essence stamp set.  I stamped the large outline flower onto whisper white card with Blackberry Bliss ink. Before it dried too much I used an aqua painted to carefully pull in some of the outline ink to colour the flower.  It gives a watercolour effect. I heat embossed the centre of the flower with gold embossing powder and punched it out before again using the aqua painter to just colour the remaining smidges of white card.  You can dab off excess ink and water with a paper towel.

TIP Keep the flow of water in the aqua painter to the minimum as it is only ordinary card and you could get bubbles and soggy card.  If you prefer use watercolour paper. 

The leaves were stamped onto Perennial Essence vellum with Old Olive ink  and punched out with the leaf punch.

These pounches are great for table favours for any event and depending on your paper size you can add a gift of choice.  I've added a mini handcream.

For the children you can make mini pouches and snip a small triangle at the bottom to all for a lolly stick to be slotted through the bottom.  This too was decorated with Floral Essence  with the flower and leaves being stamped and the leaves coloured in the same way as above.

 I hope you'll give them a try and don't forget to visit the other global Stampin' Up! demonstrators to see their tutorials and inspo for you.


To shop for any of the products used you can visit my Stampin' Up! online shop.

Thanks for stopping by Stampingscene today.

Happy crafting
Zoe x


2. Zoe Tant - You're Here


Sunday, 12 May 2019

Christmas Card Club - Children at Christmas

Our lovely Kate, has chosen the theme of Christmas with children for us this fortnight. At first I was stumped but then remembered I had a stamp from a very long, long time ago that was this small boy excited about his Christmas gifts.  It is from my stash and not even sure where it came from. However it goes well with the Ready for Christmas Stampin' Up! set.  The sentiment is part of the set and is stamped in Poppy Parade with the flourish in Garden Green.  I used the tree and staircase to create a scene and having created a paper mask of the boy was able to stamp the tree and stairs before stamping the boy.  I did however stamp the boy again onto thick white card stock so that I could use my Stampin' Blends to colour him in.  I then fussy cut him out and I'm afraid I took off his arms and legs which he regained when I added the cut image over the top of the stamped one. It also helps to add a little depth doing this.  I found that my stamparatus helped enormously for stamping the stairs and tree and getting them in the right position.  I used 3 shades of green for the tree and added some silver pen, a gold foil star and red rhinestones for the Christmas treatment.  Turned out fine in the end for Kate's theme and after all you often hear folk say "Christmas is for the children". 

The Ready for Christmas stamp set is retiring at the end of this month along with many other Stampin' Up! sets from the annual and Spring/Summer catalogues. If you haven't bought your favourite stamp set yet be sure to check out the retiring products in my Stampin' Up! Shop

Thanks for popping by.

Zoe x


Tuesday, 22 January 2019

Valentine Love with Little Elephants


It's easy to get carried away with lots of stamps, ink, punches and dies when you craft, but sometimes it's nice to go back to basics and just use stamps, ink and paper and perhaps a simple punch and tool to make life easy.  Everyone connected to Stampin' Up! is sharing #simplestamping projects to bring back everyone's mojo and also to inspire beginners who might be looking for a new craft.  Additionally sometimes the Less is More approach can have just as much impact in a project. 

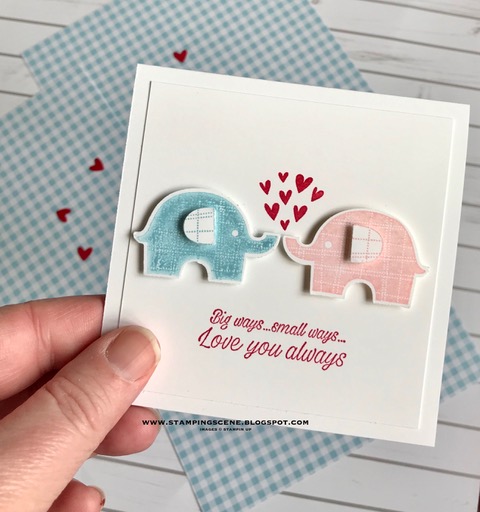
Today I'm sharing a card I made at the weekend for this very purpose.  It's my #simplestamping Valentine card.  I've used the really cute Stampin' Up! set Little Elephant which is perfect for so many occasions including friendship cards, Valentines', birthdays and as you'll see below Belated Birthday cards too!

I've also used the coordinating elephant builder punch which allows you to add depth by punching the ears out separately.  The cute spray of hearts is from the same set with the sentiment from the Accented Blooms set which also has a matching punch. 

©stampin ' up! Little Elephant Bundle
©stampin' up! Accented Blooms

As I mentioned above you can use this little elephant in different ways.  I'm behind the curve on many things at the moment as the recovery from my Achilles operation is good, but slow and a little more painful than I expected so very tiring.  Birthdays are one thing I'm late with so this card using the Little Elephant set, punch and the Make a Difference alphabet set from Stampin' Up! have helped with belated birthday wishes. 

I used markers to colour the balloons on the stamp in granny apple green, daffodil delight and real red.  A balmy blue elephant teams with the Gingham Gala designer papers from the Stampin' Up! Spring Catalogue.

That reminds me if you haven't got your copy yet please do contact me with your address details and I'll pop one in the post. 
Cute Stampin' Up! Little Elephant for belated birthday wishes
As the leg improves I'm hoping to get back to blogging more often.  Thanks for popping by and I hope to see you soon.

Hugs Zoe x


SHOP NOW
Remember that there are free gifts with purchase available from Stampin' Up! until the end of March 2019 so please do visit my online stampin' up! shop.