My STAMPING PAPERCRAFT blog - Stamping Scene

Hello and welcome to my blog. I'm a paper craft addict and love sharing my passion for paper crafting . I run online and face to face card making, memory keeping and all sorts of 3D projects. I also sell many of the products I use. If you'd like more information do drop me an email. Thank you for visiting I hope to see you again soon. Zoe x
Showing posts with label gift wrapping. Show all posts

Sunday, 1 March 2020

Ah hoy there!


The March Challenge at Moving Along with the Times starts today.  We're sharing anything but a card projects and asking you to join us and share your projects over on the MAWTT blog HERE

I've used one of Stampin' Up! 's mini pizza boxes and decorated it to make gift packaging for a present for the men in your life.  I've used some of the Golden Honey specialty designer series paper which is a free gift with purchase when you spend £45 in my Stampin' Up! shop until the end of March or while supplies last.  


I cut pieces of the paper as follows
Top   31/4" x 314" 
Sides 3/4" x 3 1/4" and you need 4. 

To the top of my gift box I added some embellishments made using the Stampin' Up! set Sailing Home from the annual catalogue and the coordinating dies Smooth Sailing.  The anchor and compass were heat embossed in gold before either being die cut or punched out with the 1 1/2" circle punch. Some gold foil rope die cuts and a sentiment from Label me Bold makes it a perfect gift box.  

The compass is really neat as the needle can be die cut separately and then using a brad can rotate on the compass face.  

The pizza boxes can double as treat boxes and are just the right size for a tasty cookie for work colleague gifts or kids treats. The inside of the box is food suitable with a lining to stop any cookie flavour leaking through.  

I hope you'll join us at MAWTT this month and thanks for stopping by. 

Happy March 

Zoe x


Thursday, 30 January 2020

There's so much more to a gift..........


 Not just because I was a little late with getting a birthday present to my sister in law, but also because she deserves something pretty, I took a little more time to wrap her gift.  Working on mostly recyclable using brown paper I added some flowers and a handmade tag with a little stamping to make this gift a little more than just pretty.

Using punches, patterned papers and some simple embellishments I created a gift that I'm hoping she found hard to open because the wrapping was so pretty.


The flowers you can simply punch and use a bone folder to gently curl the individual petals up or down and then add punched leaves from the Spring and Leaf Stampin' Up! punches.   Some I scrunched up to add to the texture and some I sponged the edges with a dauber.


Stampin' Up! Floral Essence flower centres are also a perfect fit for the flowers made from the beautiful Dressed to Impress designer series papers from the Stampin' Up! Spring Mini catalogue.


Hopefully I'm forgiven for being late and hopefully the gift has been viewed, but if it stayed on the sideboard for a while to be admired then that would be a real honour.  

For my tag I used the very modern stamp set called Label Me Bold that I also used on my last post with the Peaceful Poppy Elements.  It's got some fun background, splatter type stamps and some very up to the minute font sentiments that do exactly as the stamp set name suggests..... they say it bold and simply. 

If it's your birthday I hope you have a great day. 

Back tomorrow for the Totally Techniques blog hop when we'll share a technique that works for everyone.

Happy stamping 

Zoe x


Saturday, 22 June 2019

Thinking Outside the Box - We're making folded envelopes


It's time for the June Thinking Outside the Box Design Team Blog Hop.  Welcome to the team's share of folded envelope tutorials.  I've gone for the very simple and well known 'diaper' pouch which sounds marginally better as a tutorial name than a 'nappy' pouch but it is an easy, easy project and one I regularly share with ladies groups or indeed with children as they love paper folding and also the fact that treats go inside this cute packaging.

Step 1
So to get started all you need is a square of patterned or indeed plain paper.  You'll see I have done two versions one for kids and one for the grown ups. The smaller kids pouch started as a piece of 4" x 4" designer series paper.  The adult version is a piece that is 6" x 6".


Step 2

Fold your piece of paper diagonally to form a triangle.
Step 3

Taking the top layer of the paper fold the top point down towards the fold leaving a gap of 1/2" (1cm) approximately. 

Step 4

Fold the flap you created back up to the triangle postion then bring in one side of the triangle to run along the fold created by the flap in stage 3. 


Step 5
Do the same with the other side.
Step 6 
Bring the flap created earlier down over the top finishing the pouch. 
Step 7 
Decorate your pouch


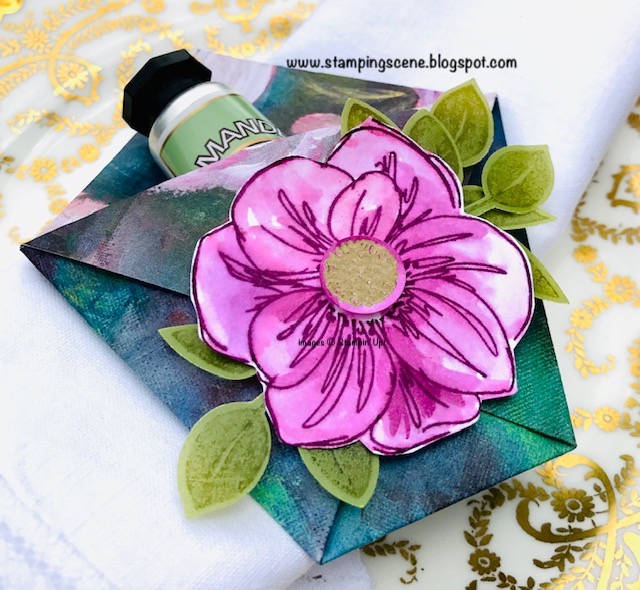
For my decoration I have used the new Stampin' Up!  Floral Essence stamp set.  I stamped the large outline flower onto whisper white card with Blackberry Bliss ink. Before it dried too much I used an aqua painted to carefully pull in some of the outline ink to colour the flower.  It gives a watercolour effect. I heat embossed the centre of the flower with gold embossing powder and punched it out before again using the aqua painter to just colour the remaining smidges of white card.  You can dab off excess ink and water with a paper towel.

TIP Keep the flow of water in the aqua painter to the minimum as it is only ordinary card and you could get bubbles and soggy card.  If you prefer use watercolour paper. 

The leaves were stamped onto Perennial Essence vellum with Old Olive ink  and punched out with the leaf punch.

These pounches are great for table favours for any event and depending on your paper size you can add a gift of choice.  I've added a mini handcream.

For the children you can make mini pouches and snip a small triangle at the bottom to all for a lolly stick to be slotted through the bottom.  This too was decorated with Floral Essence  with the flower and leaves being stamped and the leaves coloured in the same way as above.

 I hope you'll give them a try and don't forget to visit the other global Stampin' Up! demonstrators to see their tutorials and inspo for you.


To shop for any of the products used you can visit my Stampin' Up! online shop.

Thanks for stopping by Stampingscene today.

Happy crafting
Zoe x


2. Zoe Tant - You're Here


Saturday, 21 April 2018

Milk Carton Tutorial for Thinking Outside the Box Demo Blog Hop


It is time for the Thinking Outside of the Box blog hop team to share another tutorial with you. If you've not come across us before we are a group of global Stampin' Up! demonstrators who organise a monthly blog hop to share a personal version of a gift box or bag tutorial with you to give you lots of ideas and also in various languages so hopefully you'll find one that is good for you.  

If you're already on the hop you will have arrived from Yoshiko's fabulous example. Hasn't she done a great project.  If you've landed here first you'll be able to click through the next and previous buttons to continue with the hop. Thanks for joining us we hope our hop inspires you to create.  

Our theme this month is to share how to make our version of a milk carton holder including the cartons inside. I've made my really simply by adding 2, 4, 6, 8 boxes.  When I started crafting everyone talked about these boxes and I didn't understand what they meant and thought they must be something amazing and eventually i discovered that it's just a set of measurements for a very very simple box, so I hope you'll like this tutorial as one thing it is, is simple.


I've used some new sneak peek Stampin Up papers from the new Share What You Love Suite that will be released early next month to customers.  They are stunning with a shimmer that subtly catches the light on many designs in the pack. They are in the new annual catalogue, but the suite is being released early next month as a treat for us all.  The eagle eyed will also see the returning Stampin Up in colour Mint Macaron which was a favourite for lots of us and also Mossy Meadow another returner to the new Stampin Up colour offering out in June.  I'm putting a list together of all my customers who have shopped with me in the last 6 months ready to send out a copy of the new catalogue. Please contact me if you'd like one too.

I've made a tag using the Stitched Shape framelits and also the Layered Circle framelits.  I gently added Mint Macaron to a white stitched circle and then stamped images from the Love What You Do Stampin Up stamp set.  You'll see in the video and my pictures that I did the mini cartons in two colour ways and I'd love to know which you think suits the project best ie Mossy Meadow ink or Black ink with either white ribbon on the library clips or faceted gems (jelly tots as I call them).

Here's a closer look at the cartons. They are very simple and of course you can change the size for other projects and decorate in different ways.
Here are the templates I created to link with the video.
Milk Carton Base Template 

Milk Carton Handle Template


Milk Carton Support Bar Template


Now you're off to see Annette's tutorial and she is a whizz with colour and mixed media.


The hop list is also below to make it easy to follow.  

Thanks for visiting me today.  Let me know how you get on with the tutorial and share any extra tips you have for it for other crafters.  

More soon. 
Zoe x

1. Shannean Moncrieff (Australia) 2. Tanja Kolar (Germany) 3. Yoshiko Endo (Japan) 4. Zoe Tant ( United Kingdom) 5. Annette Elias (Netherland) 6. Sharlene Meyer (New Zealand) 7. Beate Wacker (Austria) 8. Aude Barbara (France) 9. Barb Stewart (Canada)

Saturday, 17 February 2018

When a box is a bag! - Gift wrap tutorial


Thinking Outside the Box Blog Hop time with all these lovely global Stampin' Up! Demonstrators.  Welcome everyone and whether you've come from Yoshiko's  blog or just joined here with me Zoe Tant I hope you'll enjoy our hop this month which features tutorials for

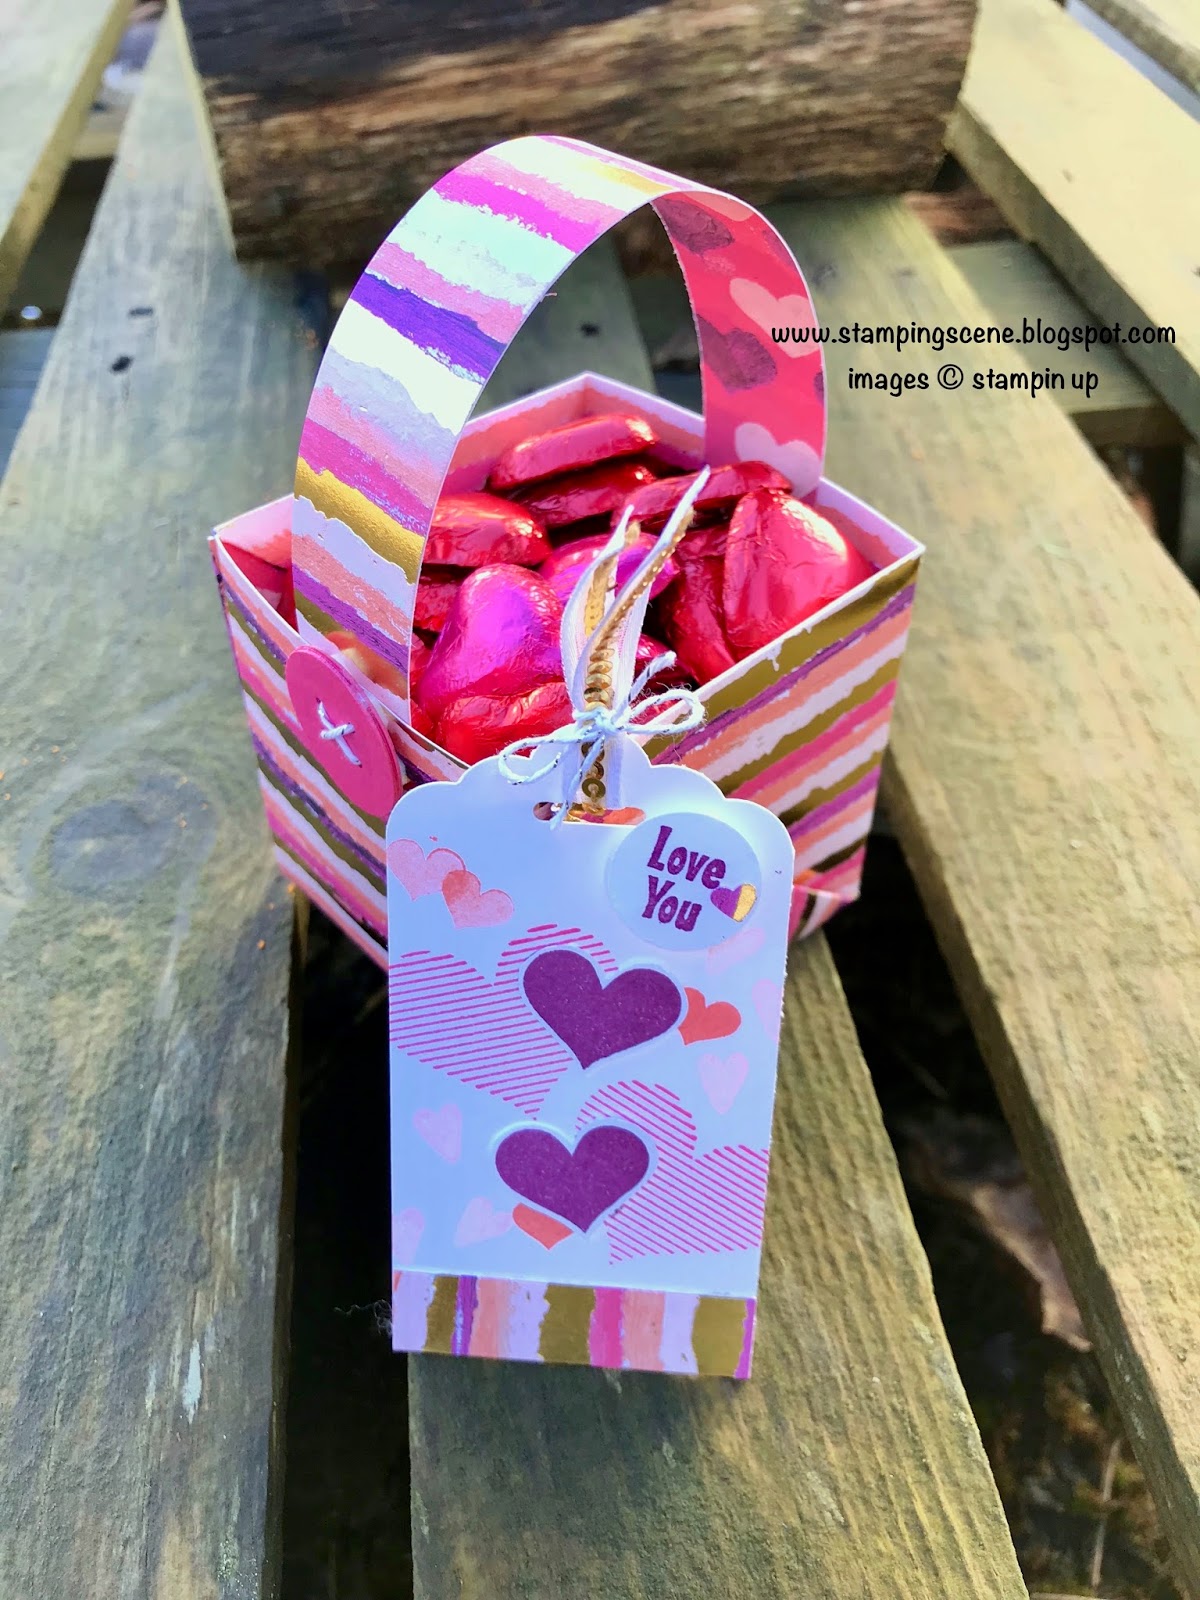
I've used an origami box pattern from Pinterest increased the size to use a full sheet of designer series paper and added a handle to make this sweet basket that only requires glue for the handle. You can make a coordinating tag that could be attached to the handle but the folding of the basket itself provides a handy pocket in which to tuck your pretty tag.  You can see how to make it in my youtube video below.


The basic measurements and products used are listed below

1. Stampin Up Sweet Soiree Designer Series Paper one cut a 12" x 12" piece so that you have one strip which is 3" x 12 " and another which is 9" x 12" 
2. Score the 9" x12" piece at every 3 inches on both sides of the paper so that you have 12 squares that are 3" x 3"
3. Score the 3" x 9"  piece on the 3" side at 1.5inches all the way down.  This will fold in half to form your handle and should be stuck on the open side with tear and tape (double sided sticky tape).  You will also need to add tear and tape on each end of the strip on one side only up to 3 inches in so that when placed inside the basket it sticks to the inside of the basket.

I've added a box on each side of the handle using Stampin Up Berry Burst 3/8" (1cm) metallic edged ribbon and it also appears on my tag.  

The tag features stamps from the Stampin Up Cake Soiree set which has coordinating dies called Sweet Cake which I've used with double sided adhesive sheets and old olive card.  When purchased as a bundle (stamps & dies) you can save 10%.  I've also used the popular Stampin Up tag topper punch to create the tag shape and some berry burst card stock.  To partially fill your basket you can add some berry burst shred that comes in a mixed colour way bag with white and silver also in the Spring catalogue. 


Of course you can make the basket in various colour ways and here is the Valentine basket I made and showed in the video. 


Thanks for visiting my blog today and I look forward to seeing you soon
Zoe xx


Please enjoy the rest of the hop. You'll love Annette's project over in The Netherlands. 


Blog Hop List 
1. Tanja Kolar (Germany) 2. Yoshiko Endo (Japan) 3. Zoe Tant ( United Kingdom) 4. Annette Elias (Netherlands) 5. Sharlene Meyer ( New Zeeland 6. Dena Rekow (USA) 7. Beate Wacker (Austria) 8. Aude Barbara (France)