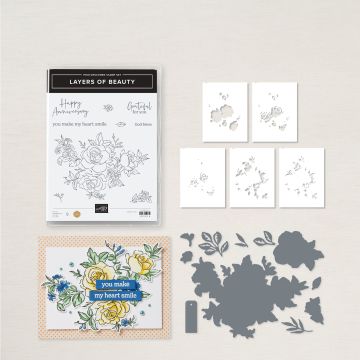
My STAMPING & PAPERCRAFT blog - Stamping Scene

Hello and welcome to my blog. I'm an independent demonstrator in the UK for a US Company that manufactures stamps and love sharing my passion for paper crafting . Thank you for visiting I hope to see you again soon. Zoe x

Monday, 14 July 2025

Ink Patterns with Sunshine Vibes


hello friend card using stampin up sunshine vibes 2025

Happy Monday are you still enjoying sunshine?  Here we managed a little gardening before getting too hot yesterday and were pleased to hear some rain as we tumbled into bed last night.  It's just what the garden needed.  

My card today sends you a happy hello.  I wanted to show you that you can use those small stamps in your sets. They sometimes seem a little random, but think outside the box a little and you can create a fun design.  I chose to stamp the line image 4 times on each piece of card, rotating the image as I went along.  

Build up the squares to create overall a larger image or background to be home to the leaf images from the same Sunshine Vibes stamp set .  These are fussy cut and easy to cut out. Remember to move your card and not your scissors when you fussy cut to get a more even border.  

The sentiment in part is from Sunshine Vibes, but the friend is from a retired set that just fitted perfectly under the semi circle which also fitted beautifully into the die cut circle from Spotlight on Nature dies.  

Add some embellishments, but position your leaves to cover some spots so you don't run out and give the impression of adding to the whole design.  

By the way the squares are all mounted onto Stampin' Dimensionals to give a little more depth and the colours are Secret Sea and Daffodil Delight with white.

Have a great week.

Hugs Zoe x


Supply List

Sunshine Vibes Stampin Up bundle


card stock example from Stampin' Up! secret sea


water based ink pads various colours - secret sea


ink pads for rubber and photopolymer stamping - Daffodil Delight yellow


muted palette dots - craft embellishments


Friday, 27 June 2025

Ways to create single layer cards - Madras Plaid Technique


madras plaid inking technique on dog birthday card


Hey everyone it's Totally Techniques time again.  Diane chose our theme of single layer cards.  This I think is more difficult than it sounds unless of course you are a CAS - clean and simple fan and even then not being able to add layers can be a challenge, but hopefully you will find lots of inspiration from our hop this month. 

I have chosen to share the Madras Plaid technique along with a super cute Dachshund dog that you'll be able to find in the online exclusive section of my shop next month.  


madras plaid inking technique with stampin up Layered Thoughts stamp


The Layered Thoughts sentiment stamp set works for everyone on your handmade card list and just add your own images to suit.  I used Layers of Beauty for the flowers. 

layered thoughts stamp set stampin up with madras plaid inked background

You might have inky fingers with this technique so why not make several pieces in different colours to keep safe for when you need them.  I used Seaside Wishes now only £7.60 for the rocks. 


Thanks for joining me today and enjoy the hop with lots of ideas.  

Keep stamping

Zoe x

You are invited to the Inlinkz link party!

Click here to enter


Supply List

seaside wishes stamp set only £7.60

Seaside Wishes - Last Chance to buy
layered thoughts stampin up stamp set


Layered Thoughts


long time no see stamp set

LONG TIME NO SEE - featuring the Daschund available 1 July 2025

flat in color pearls

2025-2027 In Color flat pearls


water based ink pad for stamping


Ink pads


Tuesday, 3 June 2025

Ideas for using embossing folders with two-tone cardstock

embossed layered two tone card to create texture on handmade card

 Hi Crafty Friends

Have you tried this? 

You need some two-tone cardstock to achieve the two shades.  Not come across two-tone cardstock let me explain.   It is lighter weight card that is white in the middle then printed in two shades of one colour, one on each side. You can get it in lots of the standard Stampin' Up! colours or in mixed colour packs.  Above I used Old Olive and you can clearly see the two tones.  The mixed colour packs can be found in our scrapbooking section because this card comes in 12" x 12" sheets.  These particular packs coordinate with Designer Series Paper and Sticker packs which can be used for scrapbooking, but are perfect for the card maker in you also. 

Now because it is white in the middle when you tear it the white will show through from the middle.  Also if you emboss it and then gently sand it with fine sandpaper or a nail file you can see the white come through.  You can leave this white to show off the embossed design like I have above or you can also used markers or colouring pencils to add more colour depending upon your embossing folder or if you wish to add more colour.  

This two-tone card is also great for matting layers to add thinner, but different colour matts and it also looks great when die cut with dies like the Textured Notes dies because again although the white isn't strong it does add to the detailing through the die cuts. 

I used three of the dies to get different edges to my rectangles and the one for the sentiment is perfect for sentiments.  Adding a few gold pearls and a touch of twisted gold thread just add that bit of luxury and sophistication.  Regular readers will know I love a bit of bling too!

The embossing folder used was a standard slim folder from the twinset Glass and Gardens embossing folders, but you can use the 3D folders also and you might find that depending upon the folder used the white may break through as you emboss to give more texture also.  You can play about and experiment.  Remember to always put the folder through your die cutting machine fold first to avoid cracking it with too much pressure.  

Have fun experimenting.  

Hugs Zoe x


Supply List & Shopping Links

two tone cardstock celebrate together pack


Celebrate Together two-tone cardstock


Turtle-y Sweet two-tone cardstock

Turtle-y Sweet two-tone cardstock


Textured Notes dies

Textured Notes Dies


glass and gardens embossing folders

Glass and Gardens Embossing Folders

Friday, 30 May 2025

How to do block stamping with acrylic stamping blocks


handmade card showing the block stamping technique


Happy Friday all, even though it is almost over for many.  You probably wouldn't think of using the blocks you pop your stamps onto as stamps themselves, but you'll learn below that they too can be used to create fun, inked colour to your card making and possibly scrapbook pages.  

You can learn different ways to use your acrylic blocks by touring our blog hop where several international demonstrators are sharing their take on this quick and easy technique.  

You will love the individuality of each custom made piece using this technique and by varying colours, spritzing and just stamping style you can make lots of original backgrounds and projects.  

I find this a very quick technique, apart from possibly a little drying time and whether you use a little, a lot or no water.  You will also want to revisit my previous post about creating water colour washes using markers and blocks and perhaps you'll combine these two techniques.  It is certainly a bunch of products that allow you to experiment and adapt to suit your own needs without needing to be a rocket scientist!

Have fun with it and enjoy my short video to show you how. 


The best thing about this is you can use any colours you want to and can create male, female, kids cards using all sorts of stamp images to suit the occasion.  What will you choose? 
block stamping handmade card using ink stamps and stamping acrylic blocks


My supply list is at the bottom of the post if you need anything to get you going and you can visit the rest of the ideas by clicking on the icons below to visit all my lovely friends and their ideas on this tutorial theme.  

Thanks for checking in and do subscribe to my youtube channel for more cardmaking tutorials. 

Keep stamping

Zoe x

You are invited to the Inlinkz link party!

Click here to enter


Supply List

acrylic blocks for rubber stamping

acrylic blocks


happy hibiscus hybrid embossing folder

Happy Hibiscus Hybrid Embossing Folder


stylish shapes dies

Stylish Shapes dies


3D embossing folder

Eyelet 3D embossing folder


water based ink pads for rubber stamping scrapbooking

Ink pads

Summer Splash


printed laser cut sentiments for scrapbooking and cardmaking

Greetings for All - Mix and Match Ephemera sentiment pack


SHOP ALL PRODUCTS

When you shop and spend £20 or more on product you can earn 10% of your product total in rewards to be used on a future purchase.  

Be sure to opt into Stampin' Up! Rewards when you sign up.

Please contact me for more details if required. 

Friday, 25 April 2025

Collage Stamping


handmade card with collage stamping technique
Hi friends join our Totally Techniques blog hop for lots of ideas about collage stamping.  We have a fabulous selection of different ways to incorporate this technique into your paper crafting.  

Today though I don't have a video as I managed to somehow delete it after filming my make so I'll explain a few ideas for you.  

Start by creating a watercolour wash background and let it dry thoroughly.  You can then stamp onto it using your chosen stamps.  Mine are from the Cheers and Sips set along with the  splatter stamps from Elements of Text.  Both sets are online exclusives with the Cheers and Sips launching on 6 May.  You can create different effects by stamping with full ink or stamping some off first on scratch paper and then using second generation ink.  Once stamped I created my own stencil using the lemon and olive dies from the Cheers and Sips dies to create it using a piece of acetate that comes in with your stamp set. It's thinner than window sheet and so not a problem for dies to cut.  Using the stencil you can add embossing paste to enhance your project with texture.  

create a stencil using dies

I also used blending brushes to add colour to white card to create the glass, umbrella and strawberry.  Be sure if you then emboss your image that you allow the ink to dry before stamping and use an embossing buddy to avoid excess powder on your image that is difficult to remove.  


ink blending on card to use for diecutting

You can also use glue dots once all your elements are completely dry to add gold leafing dots.  Stamp a simple sentiment in Secret Sea ink onto white card for an effective but easy option and a matt layer dry embossed using your favourite embossing folder.  Mine is Forever Plaid .  

Thanks for stopping by.  See you again soon and check out my youtube channel to learn more techniques.  I will do another video for this technique soon.  

Keep stamping

Zoe x

You are invited to the Inlinkz link party!

Click here to enter


 Supplies Used
elements of text rubber stamp set