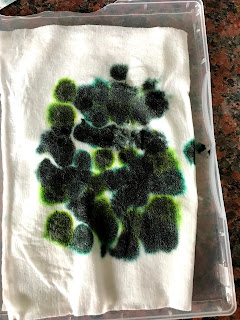
At the weekend I joined the Totally Techniques International blog team to share with you lots of ideas for the baby wipe technique. I have an 'after' product for you today. To recap you need to add drops of ink from a few re inkers onto a folded baby wipe which you place on a non porous surface. I find that a stamp case works well and i keep the occasional broken one, (usually the I've trodden on it or the dog might have tasted a corner) especially for this technique and others like shaving foam etc.
Next step is to use it as a multicoloured ink pad.
And stamp multicoloured images as you can see in my last Stampingscene post to create a beautiful background or stamped images that can be die cut and used as a focal point.
You will want to have plenty of card ready for this as you can create lots from one wipe and keep them for other projects. However as the ink spreads through the wet wipe the colours merge and so you can get extra use from it depending a little upon the colours as it can end up not quite so pretty. I firstly added a laser cut sheet from the Dandy Laser-cut paper to the homemade ink pad and then used an old brayer to run over the sheet. It pushes the paper into the ink and creates a multi-coloured laser cut piece.
As I type this one is currently drying on a window sill. I will use this as a background for another card. You can then also see that the brayer has some ink on it and has also silhouetted some of the dragonflies where the brayer didn't hit the inky wipe. I've used this on another piece of white card and will again use for another card.
Finally I have also once the dragonfly laser sheet was removed repeated this action a few times to create sheets that I can die cut images out of or use as a background. I store these in plastic wallets and can use as and when and in the case of my card I'm sharing today. I used the Quiet Meadow Bundle in the new Stampin' Up! annual catalogue to die cut some of the images to create such a card.
Tip for the butterfly as it cuts it as though it is wings closed. Cut one piece with your inked background uppermost and then cut with it on the un inked side to get an opened winged butterfly.
I used the colours Granny Apple Green, Just Jade, So Succulent and Evening Evergreen. You can see all the colours and bundles in our new catalogue online on my website or contact me to arrange for your own paper copy to browse and enjoy full of lovely products but also lots of project inspiration.
Thanks for dropping by, keep safe and keep stamping
hugs Zoe x
Evening Evergreen Re-inker


2 comments:
I really need to try this at some point!! Your card is lovely,
Hugz Tinz
Hi Zoe, brilliant technique and a very pretty card, I love the floral die and your colours, Kate x
Post a Comment