My STAMPING PAPERCRAFT blog - Stamping Scene

Hello and welcome to my blog. I'm a paper craft addict and love sharing my passion for paper crafting . I run online and face to face card making, memory keeping and all sorts of 3D projects. I also sell many of the products I use. If you'd like more information do drop me an email. Thank you for visiting I hope to see you again soon. Zoe x
Showing posts with label hand made christmas. Show all posts

Sunday, 8 July 2018

Christmas Card Club - WOW Theme


We've got a WOW theme going on at Christmas card club this fortnight.  If you haven't come across that before it does mean wow cards, but in this instance as a theme it means White on White. Which I love tinkering with, but they are not so easy to photograph especially in the sunshine we are so lucky to have at the moment.  Thank you to Christine for this challenge. 
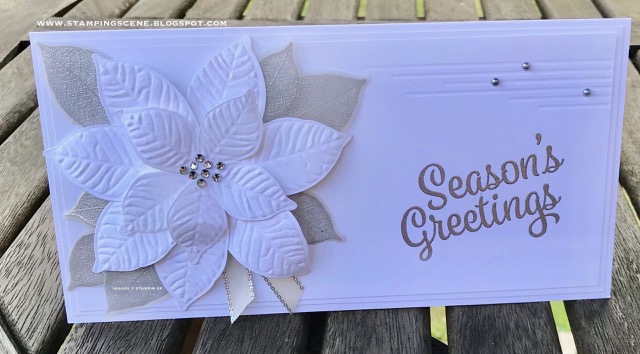
I was inspired by a beautiful card I saw by my lovely friend Shannean Moncrieff down in Australia. She used the Rooted in nature stamp set and dies to create a Poinsettia with the traditional colours that it usually comes in. I've used her clever idea and turned it white and have used my new embossing mat bundle from the Stampin' Up! catalogue, page 221 to cut and then emboss the texture onto the white leaves/petals and I've also heated embossed in silver onto vellum using the coordinating leaf stamp.  You can build the flower really easily and if you have a silicone mat you can put a blob of tombow glue onto it and build the flower on it. Add more glue when required to layer the petals and then allow to dry.  The flower then peals straight off the silicone mat and you can use Stampin dimensionals to adhere it to your project.  

I've added a sentiment from Snowflake Sentiments, also silver heat embossed and some dry embossed lines using my Stampin' Up! Simply Scored Scoring Tool.  A few rhinestones to look just like the tiny  yellow centres of Poinsettia and also some new Stampin' silver pearls.  A couple of matting layers just adds a little more luxury to my DL sized card.  

Don't forget to see the other ladies in our challenge group for more WOW inspiration.

Thanks for stopping by and remember  if you have a BIG Stampin' Up! wishlist in July you can get £130 product + £63 ink pads for only £99 with free shipping and become a discount shopper. It's so easy to do.  

More soon Zoe x

Monday, 16 April 2018

Christmas Card Club Challenge - Christmas Poinsettias and foliage


I'm a little behind the curve as we had a busy weekend celebrating Charlie's birthday which included a visit to see Olivia at university and also the main reason I haven't posted for a few days my desk top has been on strike not wanting to play.
No matter the age cake is always wanted!
However I'm here now sharing my club challenge card set by Mary.  I made a shaker card using the very pretty stamp set Peace This Christmas which I will be very sad to see retire from the Stampin' Up! range in May.  It's been a trusty set of mine and fab for foliage cards like this.  I used one stamp and coloured it with my stampin markers to stamp it twice and then fussy cut them out. I then also stamped the whole image with cherry cobbler ink to be able to fussy cut the central flower and add a little dimension with glue dots to my floral sprigs.  I also stamped a sentiment from the same set in Mossy Meadow ( a returning colour for Stampin' Up! in June) and the border is cherry cobbler from the same set too.  I used this set for previous challenges,   you can see a couple an earlier stamping scene posts and also here. The latter uses the very popular Large Letter Dies that I'm pleased to say are staying in the new Stampin' Up! catalogue and gives a different use to the popular eclipse cards. 


To make the shaker I used the Stitched Shape framelits largest circle die and cut from a piece of very vanilla card 9.5cm x 13.8cm.  I placed the vanilla layer onto my mossy meadow base card (10.5cm x 29.7 scored at 14.8cm) and let the cut circle stay on the base card whilst carefully removing the outer vanilla card. I kept my finger on the circle and drew a light pencil circle around it for respositioning later when I put it all together.  I added window sheet to the back of the vanilla layer and a circle of adhesive shaker strips.  Half a teaspoon of gold glitter flakes sit nicely on the sentiment before replacing the vanilla layer with window and sticky strip to hold it all in place.
Top Tip
Did you know that you can reduce the static by using an embossing buddy on the sentiment and window sheet before putting it all together?

Please do visit the club members and take a look at their wonderful foliage creations.

Thanks for popping by and see you soon.

Zoe x