My STAMPING PAPERCRAFT blog - Stamping Scene

Hello and welcome to my blog. I'm a paper craft addict and love sharing my passion for paper crafting . I run online and face to face card making, memory keeping and all sorts of 3D projects. I also sell many of the products I use. If you'd like more information do drop me an email. Thank you for visiting I hope to see you again soon. Zoe x
Showing posts with label die cuts. Show all posts

Tuesday, 20 October 2020

Ideas for using your Stampin' Up! DSP with The Tantalizing Stampers


Hi and welcome to another Tuesday blog hop and share of all things fun about using Designer Series Papers (DSP) on your projects.  The Tantalising Stampers are sharing ideas every Tuesday in October because Stampin' Up! has a nice discount on selected DSP during October.  You can see all the papers included in the offer and more in my Stampin' Up! Shop. 

love of leaves stampin up card with papers dies and stamps

For my share this week I've used the fun and colourful Plaid Tidings DSP on page 57 of the winter mini catalogue.  Having said colourful I've probably used one of the less bold pieces of 6 x 6" paper because I was making my card for one of the guys.  

I used the Love of Leaves bundle and took one stitched leaf die to create an aperture for my matt layer of DSP to shine through.  I've added a sentiment from the coordinating stamp set and used an off cut to matt that too.  

leaf thank you card using stampin up dsp and love of leaves

Here I used the die cut leaf shape which comes with a die that just adds the leaf veins taken from the card above.  The left over piece of dsp from the 6 x 6" shape fitted nicely onto my card base and I added some  greenery using the sprig punch. Before adhering the leaf I used a piece of double sided tear and tape to add a randomly looped piece of linen thread.  

Both cards have some enamel dots added for a little more texture.  

Simple but effective card making.  You can find all the materials in my shop.  

Enjoy the hop and all the fabulous ideas from my Tantalizing Team.  

Keep safe and keep stamping
Zoe x


You are invited to the Inlinkz link party!

Click here to enter

Tuesday, 6 October 2020

Simple Ideas for using Stampin' Up! designer series papers from the Tantalizing Stampers

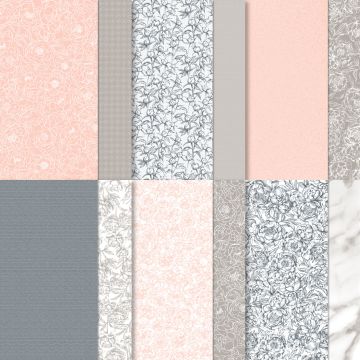
ideas for using stampin up peony garden dsp

tantalising stampers DSP ideas for Stampin Up October 2020 discount packs

Starting today and each Tuesday this October the Tantalizing Stampers are going to share some simple, fun ideas using the Designer Series Papers (DSP) that are on special offer this month. 

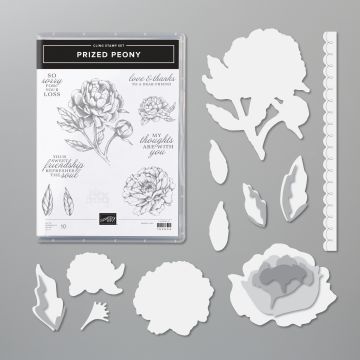
Today I've used the Peony Garden DSP and Peony dies to make a card that you can keep in your 'made cards' box and add just the right sentiment when you need it.  

The Peony Garden papers include the colours Basic Gray, Gray Granite, Petal Pink and Whisper White.  Here I've added a border using the dies and Soft Sea Foam card stock along with some Elegant Faceted Gems that are part of the Garden Peony Suite of products in the Stampin' Up! AC.  

I used a strip of DSP 7.5 x 14.3 cm adhered to a C6 white card base.  I've also die cut a white Peony and added some sponging in Petal Pink ink along with some Soft Sea Foam leaves which are fun because you can die cut detail pieces that you can sponge and give depth and definition to with some tone on tone ink sponging.  

Very easy to do and that gorgeous die cut flower says everything on it's own.  Although I do love the sparkly gems too.  

Do pop around the hop via the pictures below to see what the rest of the team have done with some of our October special offer papers.  

Happy Tuesday all, 

Hugs Zoe x

peony garden dsp


peony garden bundle


elegant faceted gems petal pink clear white stampin up uk


You are invited to the Inlinkz link party!

Click here to enter

Sunday, 2 February 2020

It's time once more for...........


Christmas Card Club although I'm a little slow on getting going. Scary I know that we now only have about 10.5 months to have our cards made and posted for next Christmas. Sorry to cause a panic, but being prepared is good wouldn't you say! Today  I've made a simple card using the Stitched Star dies from Stampin'Up!.  Sylvie's challenge was to use stars.  You can check out the other fab designs by visiting my friends in the Christmas CC via the link at the top of the page.   

This card was really easy to make with just a few simple die cuts and a little bit of layering.  The most difficult thing is the sticking and I would advise that you add some double sided adhesive sheet to the back of your card before die cutting as it make attaching pieces like the star banner much easier. I forgot so it is a fiddly job with Tombow wet glue.

I used black and gold foil card and have added some rhinestones along with a simply stamped sentiment from the Most Wonderful Time stamp set from the medley product kit of the same name.  Both the kit and the dies are still available on the carryover list from the winter mini.

Tell me what you think of the new spotlight effect photo.  Do you like it or not?  I've tried it for this post and one using the Honey Bee stamp set.  


Hard to believe that I have now done 4 posts in a row.  I'm guessing this is more like buses arriving than a sure thing for the future, but my aim is to be more consistent with posting so I hope to see you again soon. 

Happy Sunday 

Hugs Zoe x

Sunday, 21 July 2019

Christmas in July - trees

Christmas in July for Christmas Card Club Challenge - Trees

Stampin' Up! will launch its winter catalogue in September so with just a few sets in the catalogue this challenge from Christine has not been as easy as you would initially think with a simple Christmas theme of  'Trees'.  However where there's a will there's a tree!  

I've made a very simple card using the new Heirloom frames dies and embossing folders.  I added some Versamark ink to the embossing folder before adding my die cut frame to the folder.  Once dry embossed I added silver embossing powder to the frame for heating.  It has a enhanced the dry embossed texture, not perfectly but just enough to highlight the detail of the frame.  Using the middle die cut section of the frame I've added a silver heat embossed tree from the Rooted in Nature set, a Stampin' Up! favourite, and a gold heat embossed sentiment from Itty Bitty Greetings.  I've layered the image and frame onto a matt layered dry embossed with the Subtle 3D folder which does exactly as its name suggests - adds a subtle texture.  

A trio of rhinestones give a little more sparkle for a finishing touch.   

For beginner stampers you could cut a frame using a trimmer and stamp a pattern onto it, or indeed use a ruler and pen to create a frame directly on your card or then cut out with paper snips. 

It's been a very busy fortnight for us getting Charlie ready for a very important interview which he did really well in and also getting kit sorted for his trip to South Africa to research elephant migration patterns, bird counts and also some open water diving.  Our first message from him said "here safe, bags arrived too, at camp probs wont talk much!'   I guess I should be pleased to know he is there safely.  Teenage boys hey......

There's more inspiration for Christmas card making on my fellow Christmas Card Club ladies blogs so do take a look as July is traditionally a good month for early prep for the festive season and getting your handmade cards made.  

Thanks for popping by. 

Zoe x


Please contact me for more details zoetant@live.co.uk 
or check out the Join Stampin' Up! button at the top of this page.