My STAMPING PAPERCRAFT blog - Stamping Scene

Hello and welcome to my blog. I'm a paper craft addict and love sharing my passion for paper crafting . I run online and face to face card making, memory keeping and all sorts of 3D projects. I also sell many of the products I use. If you'd like more information do drop me an email. Thank you for visiting I hope to see you again soon. Zoe x
Showing posts with label stampin up. Show all posts

Friday, 28 February 2025

How to create stamping kissing technique for card making


handmade card showing the inking technique called kissing stamps and ink

Hey crafty friends

You ever had a go at the 'kissing technique' for papercrafting.  It basically means you ink a solid stamp and then kiss it with a clean image stamp to remove ink from the solid shape stamp and then when you stamp on card it reveals the shape with an image inside it.  You can spot the fish and snorkling crab in my blue circles.  It's fun and you can experiment with different colours to see which works best for you.  Also if you have a very inky ink pad you might like to try stamping off first before kissing your image onto the inked stamp to reduce the intensity of colour applied.  


Have fun on our monthly Totally Techniques Blog hop via the links below.  

Thanks for popping by

Hugs Zoe x

You are invited to the Inlinkz link party!

Click here to enter


Supply List

Kiss of Texture Stamp Set

Kiss of Texture stamp Set


submarine underwater stamp set

Submarine Life stamp set


submarine craft punch

Submarine Life Builder Punch


Tuesday, 20 July 2021

Do you like these?


 Do you like Pansies?  These are ever lasting on a card so perfect to cheer up a friend with a very simple hello card.  

All you need is an off cut approximately 5 cm wide by the length of your card.  I used the Fresh Freesia gingham from the Pansy Petals DSP.  I added a die cut scalloped edge in the same colour card stock, but if you don't have a border die you could just use a strip of the card to coordinate and add in the same way.  I've then fussy cut some flowers from the same pack of paper, layering them with glue dots and stampin' dimensionals to give some depth.  

Add a simple stamping, quick sentiment using the very popular Biggest Wish stamp set with the scripted part stamped in a darker colour to the bold HELLO.  

Finish with some coordinating rhinestones and you are done.  If you don't have these but have basic rhinestones they would work really well too or you could colour them with alcohol markers to create the same effect.  

Get using those off cuts of paper and then you can treat yourself to new papers and save 15% on selected papers from my Stampin' Up! shop this month. 

Enjoy the sunshine too of course!

Keep safe and keep stamping. 

Hugs Zoe x


SHOP PAPERS 


Scalloped Contours dies stampin up

Scalloped Contour Dies


Biggest Wish stamp set

Biggest Wish stamp set


in color jewels for craft scrapbooking self adhesive

In Color Jewels 

Sunday, 21 January 2018

Christmas Card Club - Apron of Love for Christmas Baking Theme

Stampin Up! Apron of Love arrived this week just in time for Maureen's challenge for our jolly Christmas Card Club.  She asked us to use the theme of Christmas Baking and this set just leapt out for me.  I've also used the Stampin' Up! favourite Cookie Cutter Christmas set to include a peeping gingerbread man to compliment the sentiment which is from a set I've had for years.

My colour choice is cherry cobbler, garden green, crumb cake with touches of silver with a metallic foil doily, foil utensils and some silver metallic enamel shapes.  I used the stitched shape dies teamed with layering square dies to cut and mount the sentiment.

You'll see that some of the pieces of the lovely apron are very fiddly and so to make it easier to adhere them I first added some multipurpose adhesive sheet to the reverse of my designer paper so that once die cut they already had adhesive on the back and all I needed to do was peel off the backing paper to stick them onto my card.  It makes it so much easier than adding wet glue or fiddling with glue dots.  An assortment of adhesives makes life so much easier don't you think!

To bring the apron to life I added various glue dots or stampin dimensionals to give a bit of a 3D effect layering the utensils and the pockets.  I love the sweet oven gloves one is from the Apron of Love stamp set, the other I stamped with a stamp from Timeless Textures after I had die cut them both.

I love Christmas bakes and hope you do too, so please be sure to visit the other ladies and see their Christmas bake cards.

Happy Sunday and best wishes for a crafty week.

Zoe x

Supplies available in Zoe's Stampin Up online shop

Apron of Love photopolymer stamp set 145835
Apron Builder Framelit dies 145661
Apron of Love Bundle with 10% discount 145986
Metallic Foil Doilies 138392
Metallic Enamel Shapes 141678
Multipurpose Adhesive Sheets 144106
Layering Squares Framelits 141708
Stitched Shapes Framelits 145372


 Shop now until 31 March and you could earn free stampin up stamps and accessories
visit my shop or contact me for details 07717855179 or zoetant@live.co.uk


Challenges
CHNC - ATG #369
The Corrosive Challenge - ATG
The Merry Christmas Challenge #3 - ATG


Sunday, 26 November 2017

Christmas Card Club - Mixed Media


It's time for Christmas Card Club challenge again and our challenger, Mary, asked for mixed media cards.  I've used the striking Stampin Up dies Bethlehem edgelits which coordinate with the stamp set Night in Bethlehem.  If you like nativity cards then this is a set of dies and stamps for you.  

To create my sky I used colour washes and spattering along with some clear wink of stella all on water colour paper.  I've die cut the buildings from night of navy card stock and the star from silver foil card.  The sentiment is from a retired set Good Greetings also Stampin Up and then from the Night in Bethlehem set I've heat embossed the shepherd with black embossing powder.  

A night of navy matting layer sits on top of a thick white card base. The layers of buildings are given some depth with baby stampin dimensionals. 


You can visit the other ladies in our challenge club via the button at the top of my blog.  

Thanks for visiting me today. 

Zoe x


If you like any Stampin Up products you can benefit from 

From 11pm tonight until 10.59pm on Monday 27th November.  
Please visit Zoe's stampin up shop to set up an account and add the host reward code in the bottom left of the shopping bag page for a thank you card and treat from me.  4FNFZ67Z


Monday, 3 October 2016

Christmas Card Club meets MAWTT

I'm catching up slowly with life and am beginning to feel like I'm on the mend so  I've killed two birds with one stone today to make my sketch card for Moving Along With The Times and also the festive bird theme in our Christmas Card Club set by Valery aka Mrs A.

I've used the Candy Cane Lane Designer Series Papers which you can buy during October and get a free pack for every 3 bought. There are 8 different packs to choose from so you can save yourself £10.  There's a new shopping rewards code which you need to add to your online order of £25 -£149.99.  Your order ships to you, but I'll send you a thank you gift separately for shopping with me.

To shop just look here in Zoe's Stampin' Up! shop.

Choose from 8 different designs including the two christmas sets below

 Candy Cane Lane 141981 
Presents & Pinecones 141986

In my design I've also used the Holly Berry Happiness stamp set and Holly Berry builder punch to decorate around my hand carved Robin stamp and add the festive bows.  I'll be using these items in my upcoming Stamp a Stack of Christmas Card events.  Check out my classes page for details or invite me to come and teach the class to you and your friends for a fun afternoon or evening.

Please take a look at the other Festive Birds cards in Christmas Card Club and join us for our sketch challenge at MAWTT.

Thanks for your patience while I've been absent. I'm hoping to be more consistent now.  Take care all.

Zx

Thursday, 4 August 2016

Back to School for Moving Along with the Times


Time for Team A over at Moving Along with the Times to share their next challenge with you all. This month the theme was chosen by Amy.  We'd love to see your creations for Back to School.

I've made my DT card using Stampin' Up!  Labelling Alphabet set and the ever popular owl punch. He's so adorable and very cute just like all the new kids starting back to school soon.

He's standing on a pile of books created with the new Classic Label punch and the 1/2 " circle punch. His page of paper is from the Floral Boutique Designer Series paper and I cut the shape of it using the Project Life Cards and Labels dies.   A sweet little apple for the teacher is from Thoughtful Branches which is now available to purchase, but only during  August while stocks last.

When I first saw the theme of the challenge I was stumped, but the trusty owl has come up with goods.  You can make so many characters with this little chap from teachers to nurses to tulips to ghosts and many more.  If he's not part of your craft supplies he's really a timeless addition to consider.

Please do join our challenge and check out all the other DT cards here.

Happy school day memories to you all.

Zx

Also in Challenges

    Sunny Day Crafting  -  Back to School 

Monday, 23 May 2016

At Sea on the Stampin' Up! Cruise


Ship's Log  Monday 23 May 2016

Today we are at sea on our way to the port of Naples.  It's time to hand in our swaps and then after a conference style welcome from the Stampin' Up! team, we'll be able to collect a bag of swaps various from demonstrators around the Stampin' Up! world.  We've had to make 26 and will get 25 in return. One is kept by Stampin' Up! for display boards at future events.  I'm so looking forward to seeing the different swaps and getting lots of ideas and inspiration from so many others.  I'm hoping there will be lots of ideas for me to share from the new catalogue. Different countries had different stamp sets given out at a big onstage event a few weeks ago so with luck there will be  a mass of creativity and mojo building for the months ahead.

My swap features a new in colour Sweet Sugarplum ink and card stock. It's always the same when you see the colours printed on a flyer you are never sure, but as soon as you start to 'play' with them they really get under your skin and I think this and Dapper Denim will become favourites.  I used Dapper Denim on my incentive trip blog hop card.

By now you have realised I really like Timeless Textures stamp set and I used it to create the back drop for my pretty flower.  I added some splatters in plum, but also used my gold wink of stella pen to add some shimmery splatters.  I just used the nib of the pen and coloured the stamp, quickly stamped and then made sure to clean it with a wipe between each card to make sure it didn't dry on the stamp.

The sentiment is from Endless Birthday Wishes which as a photopolymer set is easy to stamp each word separately but where you want it creating your own combo of words, not that this combo is very original tee hee!

Tonight we're having dinner in the Le Bistro, the french restaurant on board, it too has a non original name, but I believe from reviews that the food is delicious.

Back internet permitting with details of Naples soon.

Zx

Tuesday, 12 April 2016

Happy Birthday Linda

Happy Birthday to my lovely friend Linda who is celebrating her 50 th today.  It seems that 1966 was a vintage year as I have several friends celebrating this year including me! It was also the year that England last won the World Cup in football and on my 21st my home town Coventry won the FA Cup.  As I said a vintage year.

For Linda's card I've used Stampin' Up! Number of Years stamps and dies and I've added some doodle dashes with the white gel pen and some petite flowers and pearls.  The paper beneath is in the spring catalogue and is called Love Blossoms. It's probably not easy to see in the picture, but I also used my Wink of Stella clear pen to add some sparkle to the numbers just painting it over the patterned paper. I do love a bit of Wink!!!

Have a fabarooney day Linda.  Let the celebrations continue!

Cheers
Zx

ps only 3 more sleeps until the Big Stampin' Up! Crafters Gathering!!! Whoop Whoop

Sunday, 20 March 2016

Christmas Card Club - Lots of Joy


STAMPIN' UP! CHRISTMAS WITH LOTS OF JOY
We're doing tea and cake with my parents today, as Dad is getting a little stronger although he's had orders from the dietician to eat more protein and put on some weight.  Oh boy I wish I could see the dietician and receive that order lol! Mine would be to shed a few pounds or two or...... Just can't resist cake can you?

Margaret, down under in Australia, chose our fortnightly challenge theme and asked us to make Christmas cards with at least two different papers.  I've used a mixture of Merry Moments from the Stampin' Up! annual catalogue and some retired vellum papers.  I used the banner framelits to cut the papers along with the cute little banner punch for the horizontal banner stripe.  
The Lots of Joy stamp set provided the simple sentiment and the tartan tree to which I've added some silver sequins and a foil star.  I love the silver and gold doilies and so I've added one of the smaller size to lift my sentiment from the whisper white back ground and I noticed on one of the Stampin' Up! Artisan Design Team recent cards that she'd tied bakers twine to a button and stuck it on with the bow behind.  I liked the look of it so I've done it with a silver button and cherry cobbler bakers twine.    
If you like inspiration in many forms you can visit the other ladies in our challenge via the blog list on the side of my blog or go take at look at the Stampin' Up! Artisan Designers blogs who've just set up their latest blog hop.  
Enjoy the remainder of your weekend.
Hugs Zx

Tuesday, 31 July 2012

A Stampin' Up! favourite back by popular demand

Last few days to get your free ribbons and brads

The Sale-a-bration Everyday Enchantment papers were loved by you all and you all wanted more.....! Well now you can have more. You can order them while stocks last during July for £9.95.


There's is an added bonus for you also. Free brads and ribbons with every spend of  £45 during July.  Place an order for £45 during July and you'll get these gorgeous brads (30 per pack) and two rolls of very pretty, delicate organza ribbon, one lucky limeade the other calypso coral.  They perfectly match the Everyday Enchantment papers and are excellent for any project. 


Here you can see the ribbons and brads in use and also if you look back to my stampin' birthday post you can see use of the papers and the free accessories.


Saturday, 21 July 2012

Stampin' Up! Creative Elements meets triple stamping layers

I've seen this style of card on my blog trails and thought I'd give it a go and was surprised to find it's much easier than you think to achieve this effect than you might think.  I also think it gives a really wow finish and  will look good in virtually any colour way.


It's also easy to carry your design through to the inside of the card.
My colour combo is concord crush, lucky limeade and very vanilla.  It's given me the chance to sneak in some of the gorgeously fine and pretty organza ribbon that I received free with my order this month and also an in colour brad. 
Stamps used include Creative Elements and my sentiment is from Tea Shoppe. 
For the layers you just need to reduce your stamped on cardstock by 2cm in each dimension and make  your matting layer just 0.5cm bigger than each stamped layer.  Layer the layers for stamping leaving the matt layers to one side.  Centre each layer as much as you can and adhere them very gently with repositionable glue or a little bit of snail that you've fluffed with a woolly. Stamp a back ground in a lighter colour and then you use a bolder colour to stamp your main image(s).  You'll find that the overlaps don't stamp that well but once you reinsert the matting layers the 'duff' bits don't show.  Add sentiment and accents to your taste and you're done!
SIMPLES!!!
Supplies all from Stampin' Up!
cardstock - very vanilla, concorde crush
inks - lucky limeade, concorde crush
stamp sets - creative elements, tea shoppe
accessories - organza ribbon Stampin' Up! July promotion, in colour brads, snail adhesive, paper trimmer


Wednesday, 18 July 2012

Stampin' Up! Bordering on Romance

 There's still time to place an order of £45 to get your own everyday enchantment brads, 30 to be exact and 18 metres of delicate organza ribbon., which coordinate very nicely with the Everyday Enchantment papers that you can buy during July for £9.95.  You can see how lovely they are in this card where just a smidge of the paper shows, but brings the card to life and you can also see how you can use the beautiful free designer brads. To place your order contact me at zoetant@live.co.uk or call on 07717855179 or 01507 525885.
Remember you can only get this offer while stocks last.

Labels Framelits and Everyday Enchantment Suite from Stampin' Up!
I love that soft suede cardstock, goes so well with these papers. It's a fab colour that seems to team up with all the Stampin' Up! colours and tone on tone stamping with the Bordering on Romance stamp set is really effective and one other accessory that I love is the pleated ribbon. It's so soft and luxurious and only needs a small piece to make your projects have a luxury feel. It comes in 4 colours of pear pizzazz, riding hood red, blushing bride and seen here baja breeze. Just gotta love it.............

Hope you're day is a good one.
Zx

Thursday, 5 July 2012

Fr'o'nk's Stampin' Up! Incentive Trip Adventure Continues

Saturday morning was exciting for the demonstrators in Vienna as it was time to share their swaps with each other.

Here's a look at my swap

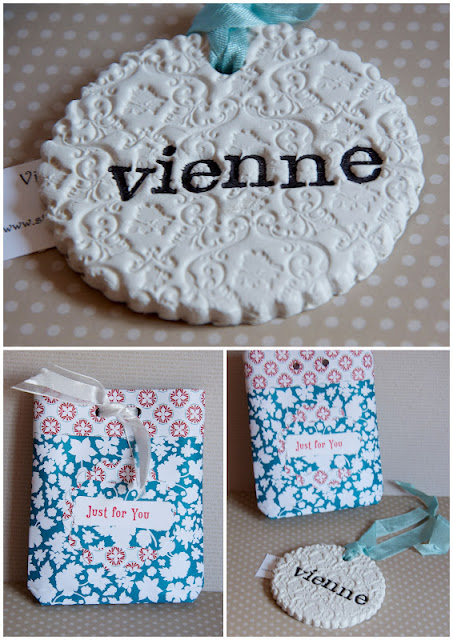
I used air dry clay and stamped it with a 'naked' Parlour Prints background and then used basic black ink to stamp Vienna in the language of the recipient. Here you see a french version (picture courtesy of Dorothy).
By the time swapping was over Fr'o'nk was somewhat bored and so decided to attract our attention by free falling from the roof of the hotel.  Luckily for him Natalie was quick of the sofa and caught him as he passed the hospitality suite window!!!


Confined to the sofa, he rested before he was  persuaded to spend the day sightseeing. He headed out for the famous Zanoni Zanoni Ice Cream Parlour for some gorgeous italian gelato.  Yes believe it or not Vienna is full of Italian ice cream shops.

He took in the sights!!
He admired one bust


And then another


Before he ignored the sign saying keep off the grass!!!


His behaviour went downhill from then on.  He took to drinking.......


After a sleep on park bench

he was caught short...........

and finally stopped by the Police

who threw him jail


where he realised the error of his ways, but not before the influence of ice cream and all the other naughties he'd consumed took their revenge.


I offered mitigation for his behaviour and persuaded the Police that his youthful exuberance and excitement had got the better of him and that he promised to behave for the remainder of the trip.  They agreed to release him.  I wish I could be this successful when negotiating life with my children.


That evening he agreed to have a quiet dinner in the hotel restaurant before joining the rest of the group in the bar.


(food picture for those of you who know who you are........)

In the bar he even bumped into George Clueknee
(who does he think he's kidding!!!!!!!!!!!! Just don't tell him that I know he's not the real George Clooney!)

It was then up the apple and pears, well up in the posh lift actually,  to the land of nod for sweet dreams about his adventure in Vienna on the Stampin' Up! UK Incentive Trip 2012.

No stuffed animals, policemen or husbands were hurt in the production of this story.