My STAMPING PAPERCRAFT blog - Stamping Scene

Hello and welcome to my blog. I'm a paper craft addict and love sharing my passion for paper crafting . I run online and face to face card making, memory keeping and all sorts of 3D projects. I also sell many of the products I use. If you'd like more information do drop me an email. Thank you for visiting I hope to see you again soon. Zoe x
Showing posts with label stampin up demo blog uk. Show all posts

Sunday, 5 April 2020

Bee Happy


Happy Sunday friends. I hope this finds you all well and keeping safe and most importantly staying at home.  This is a testing time for all of us, but it has given us time to stop and share time with distant friends via the internet. Last night we connected with friends in the USA who we had planned to see this summer, but often don't connect in between times. It was good to Zoom with them and get all the news about kids and life and how we are dealing with the pressures of what is happening to us all.  It reminded me that we all need to 'BE Happy' and this card that I promised and forgot to share following one I made with some ladies at a Stampin' Up! party.  That card used the  Flowering Foils papers with the Painted Poppies.   Whilst the promotion is over the papers I'm sure for many of you live on and so it's still good to see what you can do with them.  

For today's share I used the offcuts from the Painted Poppies cards to colour them with Stampin' Write Markers and use them as a rainbow of hope style card.  Again I used a stamp from Painted Poppies to add ink splatter in the same colours from the brights collection before adding the strips of coloured foil paper.  
I stamped the small bee from Stampin' Up! Honey Bee and die cut it out to create the 'Be' for my sentiment.  The happy is part of the Merry Christmas die set in the Stampin' Up! annual catalogue.
If you didn't get the Flowering Foils papers then you could as an alternative heat emboss strips of white card and colour them with markers or indeed you might want to look at the new Ornate Garden Specialty Papers which include some foiled papers that you could create the same effect with.
Stampin' Up! Ornate Garden Specialty Papers 152488


Keep well lovely people and stay home safe.

Hugs Zoe xx


You can buy all the supplies from my Stampin' Up! Online Shop or contact me for a copy of our latest catalogue if you don't have a demonstrator already.

Saturday, 22 February 2020

The Gangs All Meer - Stampin' Up! Saleabration

stampin up the gangs all meer

#simplestamping

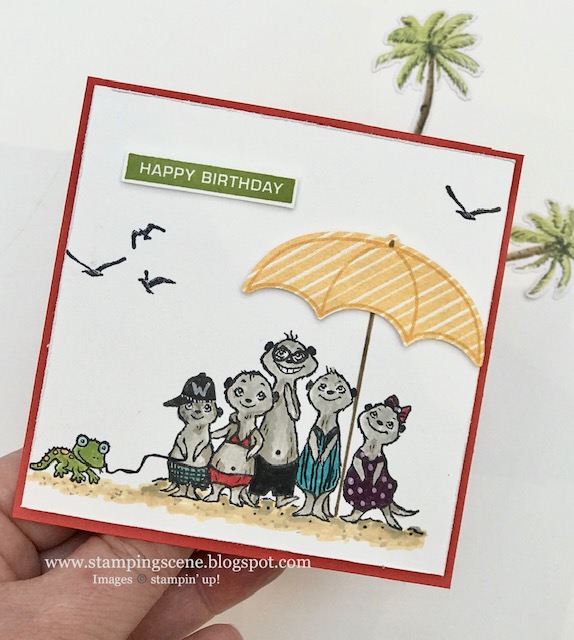
Every year Stampin' Up! offers some fabulous gift with purchase items during Saleabration and this year is no exception with these cute Meerkats proving to be very popular. It's easy to see why they have appealed to everyone, but sat at the garage waiting to have my car MOT'd/health checked I first filled my time using a card kit called Looking Up and then started doodling on a single stamped image with this Meerkat family.

I had taken some marker pens with me and my journaling pens and decided to alter the Meerkats and add some swim wear.

Once home it was easy to add a sun umbrella and of course a family pet and a seaside scene isn't complete without some seagulls from the Sailing Home stamp set.  Using the markers i added a sandy  floor blending a couple of colours and added some dots to give a grain effect.

The umbrella is from the cute set Under my Umbrella.  I stamped the outline onto patterned paper and used a ruler to add the post.

It was fun to tinker with this cute image and I hope you like my #simplestamping take on The Gangs All Meer which can be your free stamp set with an order of £45 during Saleabration which ends at the end of March.


Check out more SAB gifts in my stampin' up! shop

Thanks for popping by. 

Zoe x

Friday, 25 October 2019

How do I do the White Wash technique?


It's Totally Techniques international Stampin' Up! Demonstrator blog hop again and Nadine chose our theme of the White Wash Technique.  I've created a neutrals card and very simple although did take a little bit of time......

I started by stamping the holly leaves and berries from Stampin' Up! set Christmas Gleaming in crumb cake ink onto a thick white card base.  Next I white heat embossed the Holly, berries and swirly frame onto a piece of crumb cake card.  Now it's time for white wash.  Using a pigment ink, mine was Stampin' Up! craft white,  I used some re inker to put ink onto a clear block and watered it down by letting my aqua painter brush drip some water onto the ink.  I then painted the holly and berries with a white wash.  You need to make sure you let it dry before coming back to add some colour using your aqua painter and ink from your ink pad lids.

With the Happy Christmas I die cut the words first then white washed them all over, allowed them to dry again and then added colour to  either the top or bottom of the letters and then in reverse added Wink of Stella, it's for Christmas after all!! 

Before sticking the words onto my project I used a sponge to add some colour around the outside edges of the piece of crumb cake card helping to make the frame and holly 'pop'.

With glue gots I carefully added the sentiment once it was completely dry.  As I said it is a simple technique but does need drying time which you could speed up with a heat gun if you wished.  One reason for making sure it is dry is trying to avoid things like the holly berries not turning out to be pink instead of red.  You can of course add less colour for even more delicate shades.


You'll get lots more inspiration by clicking on the links below to see the other demonstrators takes on this challenge.  Either click each button and return here or go from blog to blog by clicking the next image on the next demonstrators blog.  Enjoy our hop and projects and have a go yourself soon at this effective technique.

Thanks for visiting and remember you can buy all the products used  at www.zoetant.stampinup.net

Enjoy the hop
Zoe x

You are invited to the Inlinkz link party!

Click here to enter

Friday, 19 July 2019

Very Versailles - easy to miss but never forgotten once seen


My card club ladies loved this card and the one we made this week.  They all admitted they hadn't spotted the Very Versailles set in the Stampin' Up! catalogue (page 113 if you've missed it too!).  However once they got to play with it they absolutely loved it and many have made the decision not to miss it again by popping it on their wishlist or in their shopping bag.  


I used a very vanilla notelet to collage stamp on with Blackberry Bliss, Mossy Meadow and Crumb Cake.  Layered over the top of my stamping I added a small piece of the leaf design paper from the Pressed Petals Specialty Paper with lace trim adhered to the reverse side and peeking out.  Before adding this I stamped 3rd generation script onto the paper and added some sponged Blackberry Bliss to the edges to make the dsp pop from the vanilla back ground.   I also added a sentiment using half the Timeless Label punch. 


On top of the patterned paper (DSP) I added a flower using 5 petals from the roll of Pressed Petals washi tape which i stuck to a punched circle and also added a recoloured Bumble Bee bottom aka Perennial Essence Floral centres.  I used an alcohol marker, Stampin' Blend, in Cajun Craze to recolour it.  

It is when all said and done a #simplestamping card with a couple of embellishment additions, but no huge skill is involved to create a pretty vintage card with a natural theme. 


All these gorgeous bits and pieces are available in my Stampin' Up! shop.  Where at the moment you can earn a bonus for shopping. Every £45 spent in a single order Stampin' Up! will reward you with a coupon code worth £4.50 off your next order in August.  T's & C's apply but the details are in the shop.  


Happy crafting and have a great weekend. 

Hugs Zoe x


Join Stampin' Up! in July or August as a discount shopper for extra benefits 


Sunday, 11 November 2018

Christmas Card Club - Gifts


Today I'm sharing a card that I made for yesterday's presentation at Stampin' Up! UK Onstage event.  If you missed yesterdays post I shared a scrapbook page for the Stampin' Up! Needlepoint Nook Suite.  Today's card features on stamp from the same set and again uses one of the coordinating punches of the suite the Pretty Label Punch.  It also coordinates with the Label Me Pretty set from the Stampin' Up! annual catalogue and I've used one of the stamps to decorate it.  

The theme for our Christmas Card Club is to share projects with gifts or ornaments on and the label is pretty enough to be an ornament and really makes this sweet little gift pop. Both it and the sentiment are from the At Home with You set.  I used Stampin Blends to get some shading on the gift and although you might not see it here it is covered with Wink of Stella for a subtle sparkle. 

I matted the stamped layer onto a piece of gold foil to make it a little more special.  Just simple stamping and punches to make a pretty card.  

Thanks Rita for a fun challenge.  Don't forget you can visit all the other CC Club ladies blogs via the page at the top to see their take on our challenge.  


Thanks for stopping by and if you like the Pretty Label Punch and/or the Label Me Pretty stamp set you can buy those along with most of the other products featured right now in my shop. 


Thanks for visiting today.  Hugs and best wishes for the week ahead. 
Zoe xx


Sunday, 22 October 2017

Chocolate, Candy Dispenser - Thinking Outside of the Box - Design Team Blog Hop


Hi and welcome to the first ever blog hop from the Design Team that has it all Wrapped Up otherwise known as Thinking Outside of the Box.  We'll be sharing different boxes and wrap designs with you over the coming months.  We've had a few teething problems with our first run, but hope you'll be patient as we get into full stride. 

If you have come from Yoshiko's blog you'll have seen what a fabulous design she has shared along with the rest of the group this month we are sharing our versions of a chocolate, candy or sweetie dispenser.  Each designer has done a FREE tutorial for you to use.  I've made my box petite, just 7cm tall,  and have used one of may current favourite colour combinations of Lemon Lime Twist, Smokey Slate, Whisper White and Black.  I've used the Snowflake Sentiements stamp set from the Stampin Up Winter 2017 catalogue and my trusty Stampin' Up! paper trimmer.  


Continue the hop by clicking on the next button and go and see Annette's fabulous design.  

Thanks for joining us and do visit again. 

Thanks Zoe x


4. Zoe Tant   -   You're here


Tuesday, 1 August 2017

Sweet images in Heartland Set

I fell in love with this sweet image as soon as I saw this year's catalogue. Living in Lincolnshire it fits our farming county perfectly.  The barn and tractor stamp also in the set are super too and are just right for young boy and older male cards.

We used this set last week at coffee and a card at The School House Coffee Bar in Horncastle and also before I went to Thailand at The Craftea Cafe in Lincoln.  Everyone loved it and of course it is a very therapeutic stamp set with gentle colouring required. We used the water colour pencils and a blender pen to move and blend the colours across the image.

You'll see an accent of Island Indigo card stock made with the Ticket Tear Border punch, new to the Stampin' Up! range this year.  We also used the Triple Banner punch to create the Pool Party banner cut at 1.5" wide.

To make sure that your stamped image doesn't run or bleed when coloured you need to use either the Archival Black stamp pad from Stampin' Up! or your black Star On ink.  Stamped onto a precept stitched shape circle which as a little more detail, but is easily created.

I love the sentiment in this set too as it is suitable for lots of occasions.

Have a great day!

Zoe x

From Today


Tuesday, 28 February 2017

Guy Greetings from Stampin' Up! for simple male birthday cards

Stampin' Up! Guy Greetings Stamp Set

Busy week last week for me with Stamp a stack of birthday cards.  We made 24 cards 6 designs and 4 of each card.  Here's one using a popular stamp set called Guy Greetings along with the new Stampin Up Spring catalogue Hexagons Dynamic Textured Impressions Embossing Folder.  This is similar to the Cable Knit one we had at Christmas as it creates a 3D effect on your card with deeper texture than ordinary embossing folders.  This particular design is super for nature cards too especially with Bee stamp sets like the one in Dragonfly Dreams.

It teamed up well with the Urban Underground designer series paper to give a luxurious feel using small strips of the specialty paper in the pack.  Can you see that you can get 2 sentiments out of one punched Decorative Label too by stamping once then turning the shape through 180 degrees before stamping again.

The car itself is stamped in black Staz On ink onto a Stitched Shape Framelit square.  Simple but effective.  This was a popular card.  You could change the colours easily too to suit the favourite colour of the recipient.

More soon Zx


Click Shop to visit my online store

Sunday, 5 February 2017

Christmas Card Club - Stampin Up Holly Berry Festive Foliage


Another fortnight another Christmas Card Club challenge, but I've been really organised this week and have 3 to share with you.  Rachel set the challenge of Festive Foliage, all my cards use the Stampin' Up! retired set Holly Berry Happiness, but if you like Holly the punch is still available.  Above I've used the fabulous Stitched Shape dies and the Layering Circles which includes some scallop edged circles to create a focal point.  I used the 3 step stamping set to create the image and added a separately stamped bow which you can punch out easily.  Love the metallic enamel shapes for my bit of bling.  Do you ever stamp your envelopes too?


This card uses the same holly set with another sentiment from Tin of Tags set.  I've heat embossed the image with copper embossing powder and added night of navy holly berries.  A simple matting layer onto a base card also in night of navy card stock. 


A vintage version of card number 2 with the outline of the holly again embossed before I stamped in the leaf colour and berries.  A little smudging with a sponge around the edge of my base and matting layer of crumb cake with the same ink to soften the edges.  

A veritable trio of wreaths sharing plenty of festive foliage.

Have a great week.  Zx

Sunday, 7 August 2016

Christmas Card Club - Stampin' Up! Shaker Card


Just back from a fantastic family road trip in France primarily to visit Olivia's french exchange friend Zoe, and for us to meet her lovely parents Ghislaine and Mattieu.  This is us in Cahors by the unique 3 towered bridge, although the quick witted of you will see the photo is of only 2 towers! It seems ironic to be sharing Christmas cards with photos like the one above when the temperature reached 38C whilst we were there also when today at home too is by UK standards warm and sunny.  

As a result of a week of drinking wine, eating cheese and delicious Canard Magret and Fois Gras (when is France and all that...... it would be rude and foolish not to partake),  I'm late with my fortnightly Christmas Card Club challenge card which has most definitely proved to be a challenge. I have struggled to take a good picture for my card challenge set by  Margaret who asked us for a card with baubles and I thought I'd go for a simple shaker card, but it the picture doesn't show how pretty and delicate it is in real life.  


I've stamped in versamark and then added 'heat and stick' powder and heated it very gently before adding Stampin' Up! gold glitter to the snowflake from Holly Jolly Greetings and the border from Peace this Christmas both sets are in the annual catalogue. The shaker beads are from my stash and the bauble is hanging on gold thread wrapped around the card multiple times and a bow with the new natural trim ribbon with gold.


Now all that remains is the usual post holiday chores and whilst the sun shines I'm off to do more washing!!! Oh joy.  

Please do visit the other ladies in the club who have lots of great ideas for bauble inspired Christmas cards for you.

Enjoy the remainder of your weekend and have a great week.

Zx


Saturday, 21 May 2016

A special thank you card

Just a quick post to share a thank you card to all my lovely team and customers and Stampin' Up! as before the sun rises in the morning Martin and I will be heading to the airport to fly out to Barcelona to join over 300 Stampin' Up! demos and their guests on a Mediterranean cruise.

I love my job and am so grateful to the folk who help and support me to build my business and earn such amazing trips.

I'm a little nervous as it's my first ever cruise and I'm not good traveller so I hope everyone is right when they say 'it's so big you won't feel the motion'.

My card is made with Timeless Textures using new in colours Dapper Denim and Sweet Sugarplum and a wood element that I shall be sorry to see go when the current catalogue retires. I've loved this cute embellishments that you can leave as wood or emboss or colour.  Of course there are my favourite splashes of bling too!

Hope to post during the week internet permitting.

Have a good one.

Hugs Zx

Wednesday, 27 April 2016

Sincerely Yours Craft Shows - Newark Stampin' Up! Workshop


I will be at the Newark Sincerely Yours Craft Show with my Stampin' Up! stand on Sunday 8th May and I hope you'll pop along and see us if you attend.

On Saturday 7th May some of the stall holders will be running workshops and that includes me offering an all day class including all materials and hot drinks.  This is one of the projects we'll be making and if you'd like to join those booked in already please do contact me for more details or contact Sincerely Yours .

On show day we will have a free make and take and demonstrations of some fabulous Stampin' Up! products.  Please do come and say hello.

If you like the Botanical Gardens Bundle including a set of dies, stamps and designer series paper used in the project above you can buy it with a 15% discount until 31 May, after that it will no longer be a bundle and the gorgeous papers will be retired.


TO SHOP - visit my Stampin' Up! UK online shop.

I'll be back later tonight with another project for the Grand Vacation Achiever's Blog Hop with some Baby Love. See you then.

Zx

Wednesday, 30 March 2016

Stampin' Up! Wildflower Fields or Flowering Fields or both?

Sale-a-bration ends tomorrow along with the opportunity to get your hands on this Stampin' Up! stamp set Flowering Fields and the designer series paper Wildflower Fields for FREE. Yes FREE you can earn a free gift with every purchase of £45 worth of Stampin' Up! goodies.


1. Set up an account and nominate Zoe Tant as your demonstrator
2. Be sure to click the box saying that you wish to be contacted by your demonstrator
3. Order a minimum of £45 excl P&P
4. Choose a free gift
5. On the shopping bag page add the hostess code for March 2YZZA6U9 in order to receive a bonus free gift from me.

This promotion ends tomorrow night at 10pm.  I'd hate for you to miss it.