My STAMPING PAPERCRAFT blog - Stamping Scene

Hello and welcome to my blog. I'm a paper craft addict and love sharing my passion for paper crafting . I run online and face to face card making, memory keeping and all sorts of 3D projects. I also sell many of the products I use. If you'd like more information do drop me an email. Thank you for visiting I hope to see you again soon. Zoe x
Showing posts with label alcohol markers. Show all posts

Friday, 30 August 2024

telescoping technique for cardmaking

handmade card showing the telescoping technique with Robin image


Welcome all to my blog today and the Totally Techniques blog hop. Tour via the links below to see different versions of the Telescoping Technique for card makers.  You could also consider this technique for adding embellishment to scrapbook pages that suit your theme.  

Today I've used the Winterly Tree Tops bundle which will be available from 4 September in our Winter Mini catalogue.  It has a fab set of papers that coordinates and some lovely bakers twine in various colours.  The set is perfect for Christmas or for any 'twitchers' ie birdwatchers that you know.  It will also work well for those always challenging masculine cards.  

This week I've been trying to use my phone to create the video with the help of my son. Where would be without our children in todays technology whizz.  I'm getting to grips with it slowly and I hope it works for you to watch.  If you like it to encourage me to keep trying do subscribe to my youtube channel. 

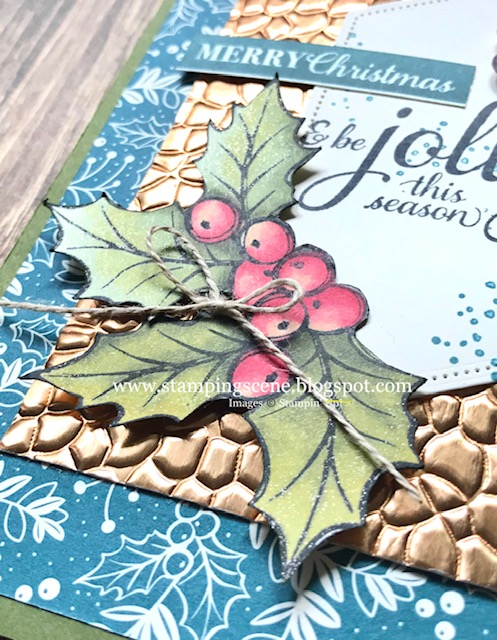
I added my telescoped image to a base card of 5.25 inches square and a few stripes of red card along with the designer paper which is called Iconic Celebrations.  It covers autumn into winter and seasonal events and gives lots of scope for Christmas cards and Diwali and celebrations of light and joy.  This suite of products can be found in the exclusively online section of my shop.

In the video I created the card below which uses the Stitched Shape dies circles as opposed to the squares from the same pack as you see above and some more easy to use products from the winter range of mix and match ephemera packs.  These will make Christmas card makes some of the easiest you will ever encouter.  

telescoping technique with robin christmas card

To add some texture to the sentiment and my telescoped image I've added a layer of card cut just a little smaller than my base card and used the de-bossed side having dry embossed it with the birch wood 3D embossing folder which is 6" x8.5" so a great size for embossing larger pieces of card. 

The weather is back to being variable here in my world and so Christmas making seems to feel right.  I'll be sharing more over the coming weeks so see you again soon. 

Happy weekend all. 

Hugs Zoe

You are invited to the Inlinkz link party!

Click here to enter


Supply List

Available Now


Stampin up garden green cardstock


 Card stock


iconic celebrations suite of craft products


Shape dies for papercraft


alcohol blends stampin blends various colours


Sunday, 24 October 2021

Joyful Life Christmas Helpers

simple fancy fold christmas card using stampin up joyful life stamp set hedgehog
 Happy Sunday and welcome to my blog on this at the moment sunny morning.  I'm sharing a very simple fancy fold card today for my contribution to our Christmas Card Club Challenge.  Today's theme is Santa's helpers so I've used the fun set Joyful Life and stamped this super cute hedgehog in Tuxedo Black Memento ink before colouring it in with alcohol markers.  Having fussy cut it out I added it to a die cut circle on a die cut scalloped circle of Shaded Spruce card.  I added a ribbon offcut by stapling it onto the green circle and some dots with a chalk marker.  A simple sentiment on a stitched die cut rectangle and you have a quick and easy card.  
fancy fold stampin up card making stamping

The card base is a C6 and I have scored the card front at 5.25 and folded it back on itself before adding patterned paper to the inside and the front panel.  
 
joyful life stamp set fancy fold card stampin up

This weekend we are empty nesters with Charlie well and truly settled into Uni and Liv has gone to meet up with Uni friends.  It's quiet without them which is nice, but I'm not sure I'm ready for it full time just yet.  The four legged critters are keeping us busy though which fills the void.  

Keep safe lovely readers and keep stamping.

Hugs Zoe x


stampin up set joyful life


Stamp Set Joyful Life


stiched rectangle dies stampin up shop with zoe tant


layering circle dies stampin up uk zoe tant


tidings of christmas dsp card making patterned papers


Saturday, 4 September 2021

Stampin' Up! Have a Robin - Stampin' for Christmas Blog hop

christmas robin card using stampin up happy holly-days stamp set

 
stampin for christmas blog hop with zoe tant uk papercraft class tutor

Stampin' Up! have been asked for many years to have a Robin stamp by UK demonstrators and not least me.  At last this year they have a fabulous stamp set called Happy Holly-days and it features this fab fellow.  I couldn't resist it and have used it very simply for this month's Stampin' for Christmas blog hop.  

Welcome to everyone visiting me today and particularly if this is your first visit to my blog.  I hope it's not the last and that you find lots of inspiration for festive cards on this international hop. 

demonstrating masking technique for rubber stamping
For my card I created a mask for the holly by stamping it onto copier paper and cutting it out just on the inside of the outline of the image.  I then used this to mask some of the holly as I stamped it across the card to give the impression of layers of holly. Below you can see the overlap stamping with the mask in place to protect the original stamped image. 

image masking for stamping and card makers
Here the mask has been removed and you can see the double image looking like one holly sprig is behind the other. 

masking technique for rubber stamping card making and scrapbooking


The Robin was originally stamped on the card and then again on another piece of card. It was easier to have the image in place to add the holly and then with the second image fussy cut it out and add onto the stamped Robin.  
I kept the card really simple by stamping in Black Memento ink and just adding Real Red using alcohol marker Stampin' Blends to make the iconic red breast and berries 'pop'. 

I layered the design piece onto a piece of DSP from the new winter catalogue pack called Peaceful Place.  This is a black, grey and silver design pack of papers that you can add any colour to for dramatic effect or just touches like this to frame your focal point.  

Also I'm sure like me you don't like waste anything and so an off cut of ribbon folded and tucked underneath the edge of layers just adds a simple finishing flourish.  

A simple, but eye-catching card for mantlepieces this Christmas. 

Carry on with the hop to see more Christmas card inspiration by clicking on the NEXT button. 

Thanks for popping by and come back soon. Now you're off to see the Crafty Medic. 

Keep safe and keep stamping
Zoe x

stampin for christmas blog hop with zoe tant uk stampin up demo


Be part of something special and enjoy all your Stampin' Up! favourites earlier, cheaper and discover a new fun community.  JOIN MY STAMPIN' UP! TEAM.


stampin up peaceful place patterned papers DSP

stampin up happy holly-days stamp set


Alcohol markers stampin blends real red and more


Sunday, 9 May 2021

Christmas Card Club

handmade christmas card reindeer wrapped in fairy lights

 Welcome to my Sunday card for the Christmas Card Club challenge.  Those in the club are used to me being a bit all over the place and I totally got my dates wrong for the last challenge which was a card with humour and today is meant to be winter sports, but I don't really have anything that would suit that and my punch art back up that I'd usually do for such a theme would be somewhat stretched so I'm catching up with my humour card.

I love this fun deer he just makes you smile and I really enjoyed the practice of using my alcohol markers. I think I'm getting better, but there's always room for improvement.  The image itself is a very old stamp set from my stash, so old I can't remember where it's from or from where I bought it.   He's just a jolly guy don't you think?

I added some border doodles with a marker pen and whilst you can't see it believe me there is a little bit of Wink of Stella on the fairy lights.  I layered him onto Granny Apple Green and Pacific point card on a white base.  I also like to make the odd card a different shape and size to the popular A6, but then Christmas comes and I'm rushing to buy or make envelopes.  Good way to use up some of those papers that we all hoard for rainy days though.  

It's stopped raining here today, but I'm going to chill with a little crafting as I had my second covid vaccination yesterday and feeling a bit sluggish today.  Hope you have a happy Sunday and that it stays dry wherever you are.  


Keep safe and keep stamping

Hugs Zoe x

Friday, 26 March 2021

Ideas for using alcohol markers AKA Stampin' Up! Blends


using alcohol markers stampin blends and rubbing alcohol on vellum to create background

I love this creation if I say so myself.  It really appeals to me because I love playing with ink and slightly off the wall looks.  It is also pleasing to me as it was an experiment that went wrong at the point of adding leaves in gold leaf that as you can see went very wrong as you can't see the leaves and my daughter said she thought it looked great with 'sponges' rather than neat gold leafed leaves.  A happy accident success and if you like it too even better!


It is now my card for the Totally Techniques Blog Hop today when this group of international Stampin' Up! demos are sharing ideas for things to do with your Stampin' Blends, our form of alcohol markers. 

This technique requires
Vellum
Stampin' Blends /Alcohol markers
Isopropyl Alcohol/Rubbing Alcohol
Versamark Ink
Heat and Stick Powder
Gilded Foiling Embellishment

You start by colouring the vellum randomly with your Stampin' Blends.  Darker colours work best to maintain enough colour to actually show. I used Magenta Madness, Rich Razzleberry and Misty Moonlight.  

Ideally you then want a small paint brush or pipette to put drops of the rubbing alcohol onto the ink and watch it do the magic.  You can move the vellum about to make the drops roll and blend the colours.  Allow it to dry and then if you want to move the ink about more add more drops.  Remember less is more with a technique like this and so build it slowly.  

Once it is completely dry you could stamp in Versamark and use heat and stick powder add a gold leaf effect or just smear the Versamark pad in random places on the design.  Sprinkle heat and stick powder over the Versamark and heat very gently until it just melts and then add some Gilded Leafing embellishment and use a sponge or dry paint brush to remove any excess. 

To finish the design I added a frame die cut using the Stitched Rectangle dies from a piece of white card that was embossed using the Subtle embossing folder.  I also added a gold heat embossed dragonfly on Magenta Madness card. 
I had spare from the original vellum piece so created a second card using the inside piece of the white card frame and then cut a stitched square from the last piece of vellum.  I made a gilded stripe using tear and tape and added the Gilded Leafing to it.

I mounted my design onto layers of Misty Moonlight embossed card and a piece of the new soon to arrive in color designer series paper stack.   The flowers stamped also in Misty Moonlight are from the Basket of Blooms stamp set and I used kit glue dots to create the gold leafed flower centres. A lush card that appeals to the bling girl in me.  I can add a sentiment to either card as and when I want or just send as an artwork card.  

Here the hope of more sunshine and warmer days still grows and that soon freedom will be ours once again.  I hope dear readers you are keeping safe and well and not too stir crazy. 

Hugs 
Zoe x

vellum card stock shop zoetant.stampinup.net
Vellum Cardstock


You are invited to the Inlinkz link party!

Click here to enter

Monday, 25 January 2021

Colouring with alcohol markers - Stampin' Up! Blends


Hi everyone. It seems and has actually been a while since I was here to share projects with you.  I hope you are all well and the year has started in a good way for you. It is better for us now, but started with COVID which wasn't nice at all, but we thank our lucky stars that we weren't hospitalised and are now feeling much better. It is therefore good to be back and start to share with you again.  

This is a card I made with my Card Club ladies in one of our zoom sessions.  I send out packs with materials and the ladies use their stamps and tools to make the cards. However this was a slightly different class as I sent them a mini set of alcohol markers or Stampin' Blends as I know them.  We used them to colour in designs from the True Love DSP.  It is amazing the effects you can create with a minimum amount of colour choice and also by using the pens to blend the colours which the alcohol nature of the pens allows.  

The coloured flower layer is matted onto another pattern from the paper pack and a piece of Rich Razzleberry card.  

I show them a simple, fancy for where the front of the card base is folded back and then the design piece overlaps it to cover much of the remaining inside of the card.  

I also used a stamp set called Approaching Perfection from the Saleabration brochure for the sentiment you see on the front and the Happy Birthday that is stamped inside.  

I always find a little colouring very calming and as you focus on getting it all inside the lines, you can temporarily leave the monotony of being stuck at home.  Give it a try if you haven't already.  

More coming soon I hope as I get the mojo working again and need less recovery naps.  

Keep safe and keep stamping

Zoe x


True Love patterned papers black and white


 True Love DSP


alcohol markers stampin blends rich razzleberry

Rich Razzleberry Stampin' Blends 


matte black dots for papercraft

Matte Black Dots


stampin up saleabration free gift with purchase

Approaching Perfection free when you spend £45 on Stampin' Up! product in January or February.  

Sunday, 12 April 2020

Happy Easter

I do wish you greetings for the Easter season, but I'm actually sharing a Christmas card with you today as it turns out to be our next fortnights share for the Christmas card club.  our them this time is Christmas Critters and so I used the utterly stunning Nature's Beauty stamp set that was featured in the Stampin' Up! Winter mini, but it is has carried over and I'm pleased to say is still raising money for mental heath charities with £2 from the sale of each set being given to charity.  Do get in touch if you'd like to support.  Many are really struggling with the challenge of COVID 19 and so any help we can give is great.

So my card is very simple.  I used the leaf stamp from the same set to heat emboss a silver design around the edge of a piece of Purple Posy card and then used a dauber to blend some ink over it to deepen the colour.  I stuck this onto a DL size card base to one side and then added a simply stamped sentiment which is punched out with the classic label punch.

The beautiful background that the rabbit sits on is a piece of Feels Like Frost designer series paper. This paper was tremendously poplar for last Christmas and will return again later in the year. It makes for easy cards with little needed as you can see to create a scene for a Christmas Critter!

To give some depth to the rabbit I first stamped him onto the paper with memento black ink and coloured him using my alcohol blends markers.  I then stamped it again on thick white card, coloured and fussy cut out the body and the front ear.  I then adhered those to the one on the paper using mini glue dots to raise it a little but not too much to create a little 3D effect.

Do visit the other ladies in our club to get some inspo for Christmas cards.  Now you have time to make them you can stock up on supplies in my Stampin' Up! Online Shop.

Happy Easter to all and I hope you've not eaten too much chocolate.

Zoe x


Sunday, 10 November 2019

Christmas Card Club - Anything Goes

 It's my turn to choose the theme for our Christmas Card Club Challenge today and I've gone with a really simple one ie Anything Goes.  It leaves the doors wide open for everyone to choose whatever. 

For my card I've used the fabulous Stampin' Up! Christmas Gleaming stamp set and famous dies 'scissors' tee hee for the fussy cutting of the holly.  I stamped the holly in memento black ink and used my Stampin' Up! alcohol blends markers to colour it.  Colours included Mossy Meadow, Old Olive, Soft Sea Foam, Cherry Cobbler and Ivory.  I'm really pleased with how the holly and berries turned out.  The gorgeous copper foil layer is embossed with a folder called Hammered Metal and the background paper is from the very, very popular Brightly Gleaming Specialty papers.   This particular paper is Vanilla and Pretty Peacock and is just gorgeous. 
Extra bling comes in the form of Wink of Stella on the leaves and berries where they catch the light and a simple linen thread bow.  My inspiration for the card came from the Stampin' Up! winter catalogue and I've flipped the design and layers a little.  When your mojo is low the catalogues are always a great source of inspiration. 

All the products are available in my Stampin' Up! Online Shop are are detailed below

Christmas Gleaming Stamp Set 150464
Brightly gleaming Specialty paper 150429
Copper Foil card 142020
Hammered Metal Embossing Folder 150646
Stampin' Blends various Annual Catalogue p179
Linen Thread  104199
Memento Black Ink132708
Pretty Peacock Ink Pad150083
Mossy Meadow Card stock 133683

Happy Sunday

Hugs Zoe x


Thursday, 31 October 2019

Monster Party

I got to play with this fun set briefly as I designed a project for the local Brownie unit.  They made tags for their Halloween Treats from Brown Owl.  Whilst prepping I couldn't resist using BOO TO YOU! to make a card for my nephew. 

First I clear embossed the balloon from stamp set Celebrate with Cake  onto black card just to give some background detail.  I added some torn and snipped card behind the black layer for interest and then proceed to stamp the monsters in black memento ink before colouring them with Stampin' Blends.  I fussy cut them out to add them to the party scene. 

The sentiment is also from Stampin' Up! set Celebrate with Cake which was white heat embossed and fussy cut also.  This stamp set is featured in our Experience Creativity catalogue which has some simple stamping sets for quick and easy cards and is also great for beginner crafters. 

You can see this mini catalogue  here

I've added some googly eyes to one monster and some glitter enamel dots for more texture.  It's a fun card for a boy who is cheeky and full of mischief.  Of course the colouring is relaxing before the storm and chaos of the party coming. 

Happy Halloween All. Thanks for stopping by

Zoe x

Sunday, 26 May 2019

Christmas Card Club - Christmas Lights

 When you are late to the party the last thing you need is to have coloured your red door only to drop the inside of your pen onto your project to get a beautiful splatter effect, but just not wanted on this occasion.................!!!!!!  It is fair to say that expletives that my Mother would chastise me for even now did exit my mouth.  I'm sorry Mum.  However once again in crafting there is a remedy to every problem, in this case not the proverbial butterfly, but a die that cuts out the door.

Our theme was chosen by Margaret who is our chief organiser. She has made a fabulous card which really says Christmas lights, do go and visit here.

Already it is Christmas card club again and we're sharing cards with Christmas lights of any kind. At first I was thinking I may have to opt for the 'anything goes' alternative option, but then thought what better lights are those that welcome folk to your home in the festive season, not only the lamps outside but the warm glow through the windows and any glass in your front door.  I've made it a festive door by adding a beautiful holly garland and door wreath.  It's a simple card with a clear message. All images were stamped with Tuxedo Black Memento ink and then I've coloured them all in with my Stampin' Blends.  Also all images are from the Stampin' Up! set At Home with You which compliments my thoughts of warm lights at home and a warm welcome.  The stamp set has coordinating dies called At Home framelits. This super set of products retire at on 3 June so if either the stamp set or dies appeal now is the time to buy.  


The stamp set is rather like a puppy - not just for Christmas and can be used all year.  The dies fit the images including one that cuts the door out as I mentioned before, but also  one that cuts it so you can open the door and reveal images behind.  You can see an example  on this stampingscene post. 

I'm running late so I'm off to visit the other CCC ladies and see what light cards they've shared.  

Thanks for checking in and Happy Bank Holiday or Memorial Day weekend.  

Hugs Zoe